


Lambda is AWS’ realization of a serverless architecture. Instead of deploying instances and scaling them manually, developers deploy only their code and AWS executes the code. Different triggers for code executions can be defined, e.g. when a new event in an AWS Kinesis stream is published or when a REST endpoint is accessed.
Since AWS takes care of Lambda execution, the Lambda does automatically scale in and out to current needs. Coupled with its “pay only for what you use” pricing and the fact that lambda execution can scale to zero when no lambda is executed, AWS Lambda is an interesting technology.
This blog article is the first in a series of articles, taking a closer look at AWS Lambda, as well as the whole AWS ecosystem that is necessary for a successful deployment.
In this article we deploy a small REST backend, using five lambdas backed by Java code to persist / fetch / update / delete user information in / from a database. In particular, we create the following five REST endpoints:
POST /users: create a new User and persist it in a database.
GET /users: get all persisted Users from the database.
GET /users/{id}: get the User with the specified id from database.
PATCH /users/{id}: (partially) update the user with the specified id
DELETE /users/{id}: delete the User with the specified id from database.
Each endpoint is backed by a Lambda function, accessing an Relational Database Service, or short RDS. Request bodies will contain objects in JSON format, as will the response bodies.
There are other tutorials and blog articles available, e.g. the official tutorial by Amazon, this article by Adam Watt on medium or this tutorial at baelung.com, but they either focus on a different language, do not show how HTTP requests trigger lambda execution, do not deploy a database or a combination of the aforementioned.
Due to the fact that this blog article describes the three essential parts of a successful REST backend deployment – an API Gateway, the lambdas backing the HTTP calls and a database – the scope of this article is a mixed bag of topics, designed to spark the interest in the reader, exploring topics of this article and get familiar with the AWS ecosystem.
What you will need:
An AWS account
git
mysql client
curl (or some other REST client)
About 60 minutes of time
Please keep in mind that since we will deploy some resources, Amazon will charge you for the deployed resources, which may cost some money. Although, we will delete all resources at the end.
Before we get started with the explanation, we start the deployment of the application through a CloudFormation template since the deployment of the application will take 10 to 15 minutes.
We start by
cloning the git repository,
changing in the project root, and
building the project via gradlew
with the following chain of commands:
git clone https://github.com/ConSol/aws-lambda-getting-started.git
cd aws-lambda-getting-started
./gradlew build
You will find five *.zip archives within aws-lambda-getting-started/build/distributions. Each archive represents one of the five Lambdas that will be created. For the CloudFormation template to be able to access those archives, we need to upload them into an AWS S3 Bucket. Log in to the AWS Management Console. Under Find Services, enter S3 and choose the first result. Click on  . Enter an easy to remember bucket name, e.g.
 codebucket-<username>, then click  . Click on the newly created bucket’s name, then click
  . Drag and Drop the five zip archives into the Upload dialogue and click
  .
.
When the archives are uploaded, click on  in the upper left and search for
 CloudFormation and choose the first result. On the following page, click on  . Select
 Upload a template file, then click  , navigate to
 <repository>/infra/createDeployment.yml and click  .
.
In the next step, fill out all fields, including the stack name, which acts as a display name. Values for RDSUsername and RDSPassword are used to configure the database instance. SourceCodeBucketName, provide the name of the S3 bucket you created earlier. If you use a company account with multiple users, you may want to change the default CIDR for the VPC and the two subnets. Write down the RdsUsername and RdsPassword, we will need them later, then click . On the next page “Configure stack options”, scroll down and click again.
The final page shows a short summary of your configuration. Check your configuration and when everything is correct, tick the box next to I acknowledge that AWS CloudFormation might create IAM resources with custom names. and click  .
.
Keep the browser tab with the AWS CloudFormation open and check its status from time to time by clicking  .
.
The template uses these information to tag the created resources with your name. Especially when you use a company account, tags allow to easily identify the owner of a resource. The information are not evaluated by ConSol in any form.
Among other things, you deployed an RDS-Instance running a MySQL-Server, five Lambda functions and a Gateway containing the REST API. Those are the essential parts of our web application. The “other things” are technicalities, like Networks, Access Rules and alike, which are necessary for our REST backend to run, but not part of this article. They will be covered in an upcoming article.
Looking at the project structure of the git repository, we see five submodules:
create-new-user,
delete-user-by-id,
get-all-users,
get-user-by-id, and
update-user-by-id
Each module represents one of the Lambdas deployed through the template. The Lambdas are independent, i.e. they do not share any internal resources. As a consequence, each module defines the User POJO, realizing a shared-nothing architecture. AWS Lambda allows access to common resources, like POJOs, through stacks, but those are not covered by this article.
We start by looking at the module create-new-user. The actual implementation of the Lambda can be found in de.consol.dus.aws.lambda.CreateNewUser. Looking at this class, we first notice the import statements:
import com.amazonaws.services.lambda.runtime.Context;
import com.amazonaws.services.lambda.runtime.RequestHandler;
import de.consol.dus.aws.lambda.model.User;
import javax.persistence.EntityManager;
import org.hibernate.HibernateException;
import org.hibernate.SessionFactory;
import org.hibernate.boot.registry.StandardServiceRegistryBuilder;
import org.hibernate.cfg.Configuration;
import org.hibernate.service.ServiceRegistry;
Class de.consol.dus.aws.lambda.model.User is a POJO, representing the User-objects of our application. The other imports are Hibernate-, JPA- or AWS Lambda-dependencies. We use Hibernate and JPA to implement persistence. To understand the AWS Lambda dependencies, let’s take a closer look at the classes definition:
public class CreateNewUser implements RequestHandler<User, User> {
Implementing the interface com.amazonaws.services.lambda.runtime.RequestHandler<I, O> is necessary in order for AWS to recognize this class as a Lambda implementation. It defines a single method public O handleRequest(I input, Context context). The generic parameters I and O describe the input- and output-type of the Lambda. If a function does not need any input or output, the corresponding type can be set to Void. If the return value is Void, the method should return null.
Now, let us examine the implementation of handleRequest(User input, Context context) within CreateNewUser:
  /**
   * Handler method to create and store a new {@link User}.
   *
   * @param newUser
   *    The new user.
   * @param context
   *    Context of AWS.
   *
   * @return
   *    The stored user.
   */
  @Override
  public User handleRequest(User newUser, Context context) {
    context
        .getLogger()
        .log(String.format(
            "newUser{name=%s, email=%s}",
            newUser.getName(),
            newUser.getEmail()));

    EntityManager manager = sessionFactory.createEntityManager();
    try {
      manager.getTransaction().begin();
      manager.persist(newUser);
      manager.getTransaction().commit();
      User persisted = manager.find(User.class, newUser.getId());
      context
          .getLogger()
          .log(String.format(
              "persisted{name=%s, email=%s}",
              persisted.getName(),
              persisted.getEmail()));
      return persisted;
    } catch (Exception e) {
      manager.getTransaction().rollback();
      context.getLogger().log(e.toString());
      throw e;
    } finally {
      manager.close();
    }
  }
If you have worked with JPA before, this should look familiar to you: the method uses an EntityManager to persist the newUser to database. We will talk about creating the database connection a little bit later.
AWS takes care of passing the parameter – newUser and context – to this method. Objects are passed as JSON string, where again AWS takes care of JSON (de)serialization. Parameter context provides access to the execution context. In the given example, the context is used to log some messages.
We set up the database connection through a private static field and a static initialization block:
  private static SessionFactory sessionFactory;

  [...]

  static {
    Configuration configuration = new Configuration();

    String jdbcUrl = String.format(
        "jdbc:mysql://%s/%s",
        System.getenv("RDS_ENDPOINT"),
        System.getenv("RDS_DB_NAME"));

    configuration
        .addAnnotatedClass(User.class)
        .setProperty("hibernate.connection.url", jdbcUrl)
        .setProperty("hibernate.connection.username", System.getenv("RDS_USERNAME"))
        .setProperty("hibernate.connection.password", System.getenv("RDS_PASSWORD"))
        .configure();

    ServiceRegistry serviceRegistry =
        new StandardServiceRegistryBuilder().applySettings(configuration.getProperties()).build();

    try {
      sessionFactory = configuration.buildSessionFactory(serviceRegistry);
    } catch (HibernateException e) {
      System.err.println("Initial SessionFactory creation failed." + e);
      throw new ExceptionInInitializerError(e);
    }
  }
Using a static field and a static initialization block allows the caching the SessionFactory. Since AWS handles creation of Lambda instances, we can prevent unnecessary instance recreation by creating it statically. The database connection is configured through the four environment variables RDS_ENDPOINT, RDS_DB_NAME, RDS_USERNAME and RDS_PASSWORD. We will see how they are set later. Furthermore, we see a file hibernate.cfg.xml in the resources folder to define the database driver, dialect, connection pool size, etc.
Let us take a look at de.consol.dus.aws.lambda.GetUserById in submodule get-user-by-id. The imports, as well at the static initializer are identical to CreateNewUser. What is different is the input type:
package de.consol.dus.aws.lambda;

[...]

/**
 * A class representing the Lambda to get an existing {@link User} from database by id .
 * <br>
 *
 * Database connection is configured through the following environment variables:
 * <ul>
 *   <li><code>RDS_ENDPOINT</code>: the URI to the database service</li>
 *   <li><code>RDS_DB_NAME</code>: the name of the database to use</li>
 *   <li><code>RDS_USERNAME</code>: username to access the database</li>
 *   <li><code>RDS_PASSWORD</code>: password to access the database</li>
 * </ul>
 *
 * @author Marco Bungart
 */
public class GetUserById implements RequestHandler<Long, User> {

  private static SessionFactory sessionFactory;

  /**
   * Handler method to get an exsiting {@link User} from database by her/his id.
   *
   * @param id
   *    The id of the user to get.
   * @param context
   *    Context of AWS.
   *
   * @return
   *    the user.
   * @throws NoSuchUserException
   *    If no user with the given ID exists.
   */
  @Override
  public User handleRequest(Long id, Context context) {
    EntityManager manager = sessionFactory.createEntityManager();
    Optional<User> result =  Optional.ofNullable(manager.find(User.class, id));
    manager.close();
    result.orElseThrow(() -> new NoSuchUserException(id));
    return result.get();
  }

  [...]
}
Instead of a complex object, this method expects a Long as is first argument. Also, this method throws an NoSuchUserException, if no user with the specified id exists. Again, AWS takes care of de/serialization of both the argument, as well as the exception when it is passed back to the caller.
Lastly, we will look at the implementation of de.consol.dus.aws.lambda.UpdateUserById in module update-user-by-id.
package de.consol.dus.aws.lambda;

[...]

/**
 * A class representing the Lambda to update an existing {@link User} from database by id .
 * <br>
 *
 * Database connection is configured through the following environment variables:
 * <ul>
 *   <li><code>RDS_ENDPOINT</code>: the URI to the database service</li>
 *   <li><code>RDS_DB_NAME</code>: the name of the database to use</li>
 *   <li><code>RDS_USERNAME</code>: username to access the database</li>
 *   <li><code>RDS_PASSWORD</code>: password to access the database</li>
 * </ul>
 *
 * @author Marco Bungart
 */
public class UpdateUserById implements RequestHandler<UpdateUserRequest, Void> {

  private static SessionFactory sessionFactory;

  /**
   * Handler method to update an existing {@link User}.
   *
   * @param updateRequest
   *    The {@link UpdateUserRequest}, representing the changes to the user.
   * @param context
   *    Context of AWS.
   *
   * @return
   *    always {@code null}.
   */
  @Override
  public Void handleRequest(UpdateUserRequest updateRequest, Context context) {
    EntityManager manager = sessionFactory.createEntityManager();
    CriteriaBuilder builder = manager.getCriteriaBuilder();
    CriteriaUpdate<User> update = builder.createCriteriaUpdate(User.class);
    Root<User> root = update.from(User.class);
    context.getLogger().log(String.format("updating user %d", updateRequest.getId()));

    updateRequest.getName().ifPresent(n -> {
      update.set(root.get("name"), n);
      context.getLogger().log(String.format("updating name to %s%n", n));
    });

    updateRequest.getEmail().ifPresent(e -> {
      update.set(root.get("email"), e);
      context.getLogger().log(String.format("updating email to %s%n", e));
    });

    update.where(builder.equal(root.get("id"), updateRequest.getId()));

    try {
      manager.getTransaction();
      manager.getTransaction().begin();
      int numUpdated = manager.createQuery(update).executeUpdate();
      context
          .getLogger()
          .log(String.format(
              "Updated %d entries",
              numUpdated));
      manager.getTransaction().commit();
    } catch (Exception e) {
      manager.getTransaction().rollback();
      throw e;
    } finally {
      manager.close();
    }
    return null;
  }

  [...]
}
This is an example of a Lambda returning no value. Thus the second generic parameter is set to Void, and the handler returns null. Furthermore, to allow partial updates of the entity, it expects a separate UdateUserByIdReqest as its parameter. Methods getName() and getEmail() of UpdateUserByIdRequest return an Optional<String> instead of String.
Go back to your browser tab and check the status of the stack. It should say CREATE_COMPLETE. If it says CREATE_IN_PROGRESS, wait until its status changes to CREATE_COMPLETE. At the bottom of the page, you should see a console with multiple tabs.
If you do not see the console, you should see these icons  in the lower right. Click the middle icon.
Click on  . You should see two Keys
 GatewayUri and DatabaseUri. Write them down, we will need them later.
Let’s take a look at the Lambdas, which were generated by the CloudFormation template. Click on and enter AWS Lambda, choose the first result. You are greeted by a page with at least five Lambdas, whose names start with ByTemplateCreatedLambda. If you already have some Lambdas defined and you do not see (all) five ByTemplateCreatedLambdas, enter ByTemplateCreatedLambda in the search box.
Click on ByTemplateCreatedLambdaCreateNewUser<YourFirstName><YourLastName>. This will take us to the configuration of this particular Lambda.
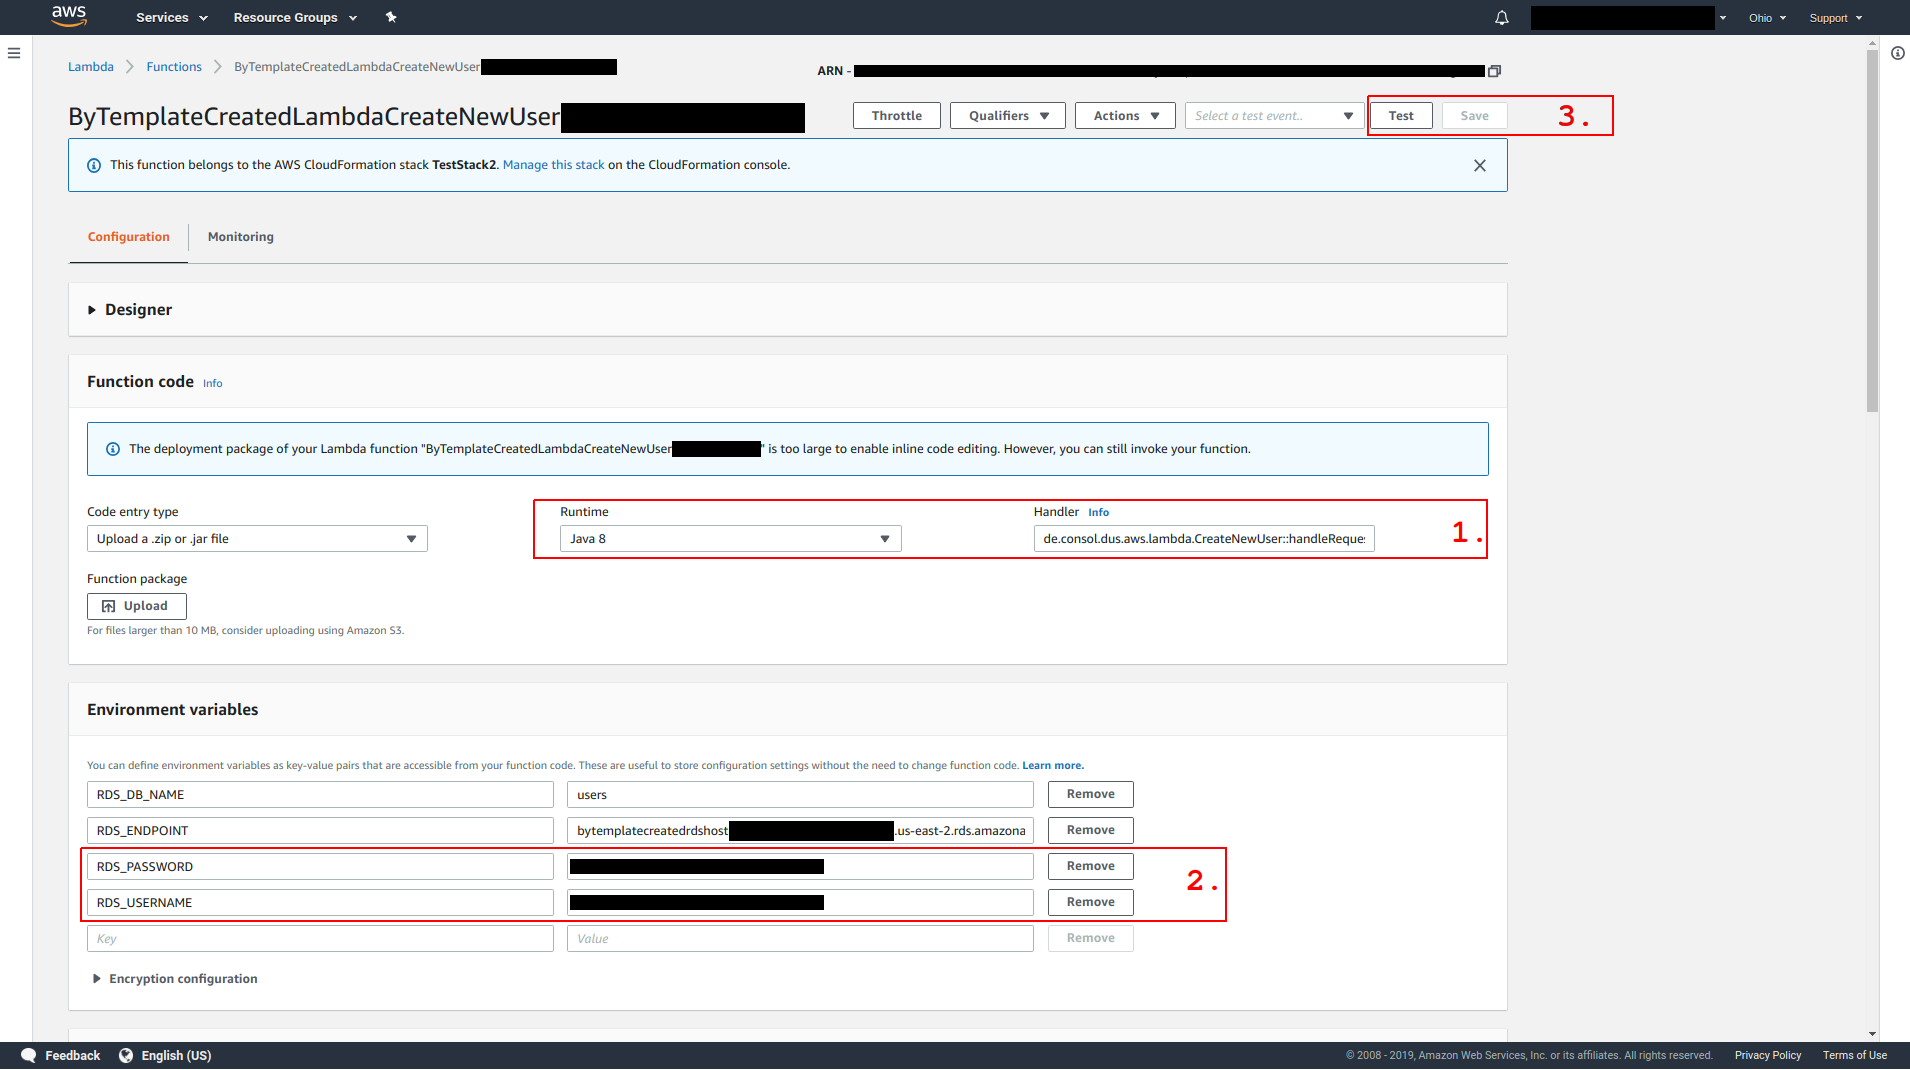
In the middle of the screen we see the handler method – which is the entry point for Lambda execution – as well as the configured runtime (1.). Our Lambda runs on Java 8, the handler is defined as de.consol.dus.aws.lambda.CreateNewUser::handleRequest.
Scrolling down, we see a set of environment variables. You should recognize the values for the variables RDS_USERNAME and RDS_PASSWORD (2.). These are the values you provided as we deployed the template. The values for RDS_ENDPOINT and RDS_DB_NAME were set by the template. Taking a closer look, we see that the value for RDS_ENDPOINT is the same as the tab of the template showed for key DatabaseUri.
Right below the block of environment variables is a block of tags. Here we see that for key Owner the value <YourFirstName>.<YourLastName> is set. Further down, on the right side is the Basic section. Here we can configure the maximum memory capacity, as well as a timeout for Lambda execution.
We will skip discussing the Execution Role-, Network- and Debugging and error handling-Section for now.
The other Lambdas look very similar, with the only configuration changing from Lambda to Lambda being the handler.
Now that we have taken a look at the created Lambda, let’s test the implementation. Scroll to the top of the page and click  on the upper right (3.).
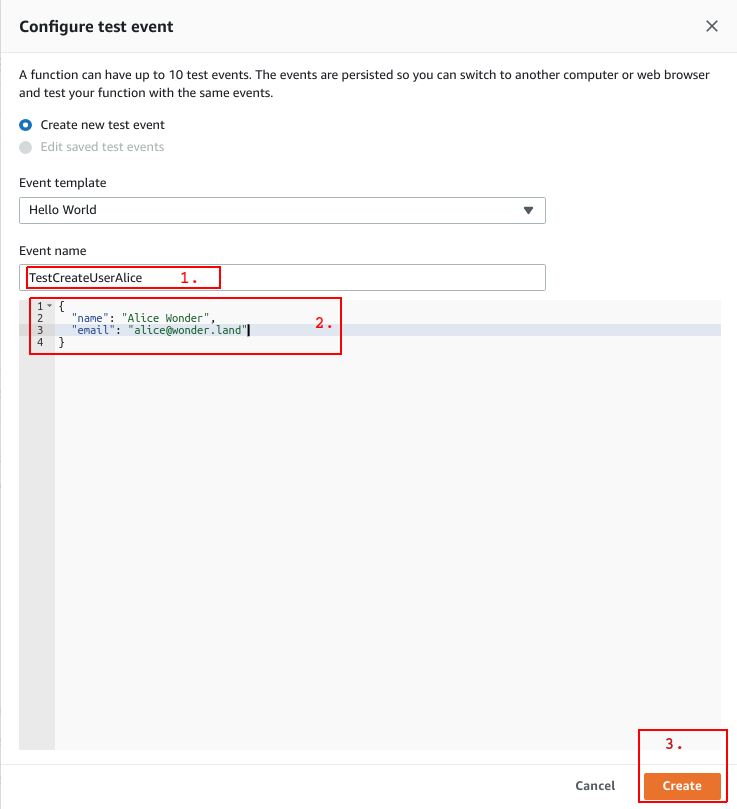
For event name, enter TestCreateUserAlice (1.), in the editor below (2.) enter
{
  "name": "Alice",
  "email": "alice@wonder.land"
}
This is the JSON which will be passed to the Lambda. Click  (3.), then click again to run the test. It may take some time until the Lambda is executed. This is due to the fact that AWS spins up the JVM, successive executions will be faster.
After test execution, we see the message Execution result: failed. Clicking on  gives us access to the stack trace. Near the bottom of the trace, we see this line:
Caused by: java.sql.SQLSyntaxErrorException: Unknown database 'users'
Sadly, as of now there is no way to create a database schema for an RDS through a template. To fix this, we have to create the database and its schema manually. For this, open a terminal of your choice and execute
mysql -h <DatabaseUri> -P3306 -u<RdsUsername> -p<RdsPassword> < /path/to/aws-lambda-getting-started/infra/createDatabase.sql
With RdsPassword being the DatabaseUri provided by the Outputs of the template. After that, execute the same command again, but without the part after < and select the database users
mysql -h <DatabaseUri> -P3306 -u<RdsUsername> -p<RdsPassword>
USE users;
We will use this terminal to verify that the execution of the Lambda test we created a moment ago actually writes some data to the database. Go back to the AWS Lambda page and click on again. This time, execution should success and you should see the following response:
{
  "id": 1,
  "name": "Alice Wonder",
  "email": "alice@wonder.land"
}
We can verify that Alice was persisted to the database by executing the following command in the SQL terminal:
SELECT * FROM user;
You can write similar tests for the other Lambdas as well. Here are some examples:
For GetAllUsers, pass an empty JSON as parameter: {}
For GetUserById, pass just a single integral as parameter: 1
For UpdateUserById, pass
{ "id": 1, "name": "Bob Builder" } to change Alice’s name to Bob,
{ "id": 1, "email": "bob@builder.com" } to change Bob’s email,
{ "id": 1, "name": "Alice Wonder", "email": "alice@wonder.land" } to revert the previous two changes
For DeleteUserById, pass just a single integral as parameter: 1
To change a Test, click on its name (to the left of the button), and then click  .
.
If you delete all entries from database, please execute the test for CreateNewUser once more before proceeding, so that at least one user is stored in database.
We have triggered the Lambda functions manually, but have not yet seen how they are exposed through REST endpoints. Amazon’s API Gateway is the service responsible for this functionality. click on , enter API Gateway and choose the first result. On the left, under APIs, we see UserEndpoint<YourFirstName><YourLastName>. Clicking on this entry opens all available Resources and methods:
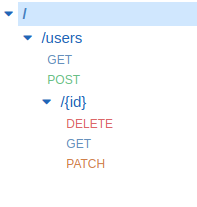
The paths represent the resources, whereas the HTTP verbs (GET, POST, …) represent the endpoints. Clicking on, for example GET under users opens the configuration of that endpoint.

The Method Request (1.)is the configuration of the endpoint. Here we can configure access limitations, accepted request headers and alike. Integration Request (2.) defines the action performed when the endpoint is called. Clicking on this item shows that the endpoint is bound to the Lambda ByTemplateCreatedLambdaGetAllUsers<YourFirstName><YourLastName>. All other configurations for this endpoint are empty. This is to be expected since no request parameters from the request are passed to the Lambda function. To return to the previous page, click  at the top of the page.
Integration Response (3.) defines the mapping from the return value of the Lambda to what is passed back as response. In our case, the behaviour is set to passthrough, so the value returned from the Lambda is returned as-is. Furthermore, if we wanted to map certain exceptions to certain status codes, we would configure them here through regular expressions.
The section Method Response (4.) lets you define the schemas for response headers and bodies for different error types. In our case, we just defined a mapping for status code 200 OK and sets the response body to the default Empty model.
We can test the behaviour of the endpoint by clicking  (5.). As request body, enter
 {} and click  . You can see the response on the right. The Response body is a list of
 User objects in JSON format. If you have not yet deleted the user Alice, you will see a list containing single entry, otherwise you will see an empty lis. The Content-Type is set to application/json, as defined in the Method Response of this endpoint.
Moving on to a more interesting example, click on the GET endpoint below /users/{id}, and then on Integration Request. The Lambda GetUserById needs the id of the User to get as its parameter. In the given case, id is a path parameter of the URL. In order to pass this parameter to the Lambda, we need to define how to map the parameter to the input of the Lambda function. Scroll down to Mapping Templates and expand it. You should see one mapping for Content-Type application/json defined as
$input.params('id')
Through $input.params(...), we can access path- and request parameters. The values in this template are passed as argument in JSON format to the Lambda. AWS takes care of Deserialization. We just pass the path parameter id to the Lambda.
The endpoint DELETE /users/{id} defines the same mapping template.
Finally, we take a look at the endpoint PATCH under /users/{id}. Clicking on Integration Request shows us that this endpoints executes the Lambda UpdateUserById. This Lambda needs an instance of UpdateUserByIdRequest as parameter. Furthermore, we want to use one variable form the path (namely the id), and the other values from the request body. Expanding the Mapping Template shows us the template definition:
#set($name = $input.path('$.name'))
#set($email = $input.path('$.email'))
{
    "id": $input.params('id')
    #if ($name != "")
        , "name": "$name"
    #end

    #if ($email != ""),
        "email": "$email"
    #end
}
The first two lines starting with #set extract the values of the attributes name and email from the JSON object which is passed to the endpoint (thus the leading $.) and store them in local variables $name and $email.
The rest of the template defines the JSON object passed to the Lambda function. The id of the UpdateUserByIdRequest is set to the path parameter id: $input.params('id'). Since name and email are optional (neither of them has to be set, although not setting both of them will result in an IllegalArgumentException being thrown), they are only included in the JSON object if they are present, i.e. not equal to the empty string.
The Integration Request mapping for the endpoint POST under resource /user is very similar to, albeit somewhat easier since this request does not define optional parameters.
We can test the behaviour of our message by clicking at the top of the page and then clicking . This time, enter Alice’s id (most probably 2 if you have followed all steps so far) for the path parameter and { "name": "Bob Builder" } as request body and click . The method does return null, but executing SELECT * FROM user; in the database terminal shows us that Alice’s name has indeed been changed to Bob Builder.
So far we executed all tests within the AWS console. But since our endpoints are publicly exposed, we can also test them with external HTTP requests, e.g. through curl. To test our backend, we need the URL through which our backend is accessible. On the left, click on  and then on
  . At the top of the page, you should see the Invoke URL. You may notice that this is the same URL as the
 GatewayUri in the Outputs of the template. Copy it. Open a terminal and execute some curl commands:
> curl -X GET <RestApiUrl>/users
[{"id":2,"name":"Bob Builder","email":"alice@wonder.land"}]

> curl -X POST -H "Content-Type: application/json" -d '{ "name": "Clair Clear", "email": "clair@clear.com" }' <RestApiUrl>/users
{"id":3,"name":"Clair Clear","email":"clair@clear.com"}

> curl -X GET  <RestApiUrl>/users
[{"id":2,"name":"Bob Builder","email":"alice@wonder.land"},{"id":3,"name":"Clair Clear","email":"clair@clear.com"}]

> curl -X PATCH -H "Content-Type: application/json" -d '{ "email": "bob@bulder.com" }' <RestApiUrl>/users/2
null

> curl -X GET <RestApiUrl>/users
[{"id":2,"name":"Bob Builder","email":"bob@bulder.com"},{"id":3,"name":"Clair Clear","email":"clair@clear.com"}]

> curl -X PATCH -H "Content-Type: application/json" -d '{ "name": "Alice Wonder", "email": "alice@wonder.land" }' <RestApiUrl>/users/3
null

> curl -X GET <RestApiUrl>/users
[{"id":2,"name":"Bob Builder","email":"bob@bulder.com"},{"id":3,"name":"Alice Wonder","email":"alice@wonder.land"}]

> curl -X DELETE <RestApiUrl>/users/2
null

> curl -X GET <RestApiUrl>/users
[{"id":3,"name":"Alice Wonder","email":"alice@wonder.land"}]
To delete all resources created by the template, you just need to delete the stack. For this, click on , enter CloundFormation and choose the first result. Mark the checkbox to the left of your stack, then select  ,
,  . Finally, delete the S3 bucket you created to provide the
 *.zip archives. Click on , enter S3, choose the first result. Mark the checkbox to the left of your S3 Bucket and then click  .
.
In this blog article, we have deployed a REST backend through a CloudFormation template, backed by Lambda functions and exposed through an API Gateway. We have looked at how to implement Lambda functions using Java and tested them through the AWS console. We have learned how to execute Lambda functions as an response to an incoming HTTP request and how to map input- and output parameters of the Lambda function. Finally, we have tested the REST endpoints through the AWS Console, as well as with curl.
If you have any questions or remarks, feel free to contact me via marco(dot)bungart(at)consol(dot)de or Twitter.