


In this article, I will show you how to install Red Hat OpenShift Container Platform 4.3 (OCP) on VMware vSphere with static IPs addresses using the openshift installer in UPI mode and terraform. In contrast to the official OpenShift 4.3 install documentation, we will not use DHCP for the nodes and will not setup the nodes manually - instead we will use static IP addresses and terraform to setup the virtual machines in our vCenter.
Since this article will not describe basic requirements like the minimum VMware vSphere version, a good start would be to consult the official OpenShift documentation: https://docs.openshift.com/container-platform/4.3/installing/installing_vsphere/installing-vsphere.html
Let’s take a look at the hosts we will be faced with in this setup.
bastion / install host: the bastion host will be the host, where we execute our openshift-installer and terraform commands. This node can be your workstation or a temporary Linux VM. After a successful installation, this node can be removed - please ensure to save your installation configuration (ssh-key, ignition files, etc.) into an external location (fileshare, git-repo, …).
http host: the http host will provide the ignition file for out bootstrap node via http. Of course you can setup an http server on the bastion / install host. After bootstrapping OpenShift, this host can be removed as well.
external loadbalancer (lb): this node is optional. If you have some kind of real hardware loadbalancer like F5 BigIP, use this one. For this test installation we will setup a very basic HA-Proxy on a Linux VM.
The following nodes will be provisioned on your VMware vSphere environment:
This picture shows our landscape while installation:
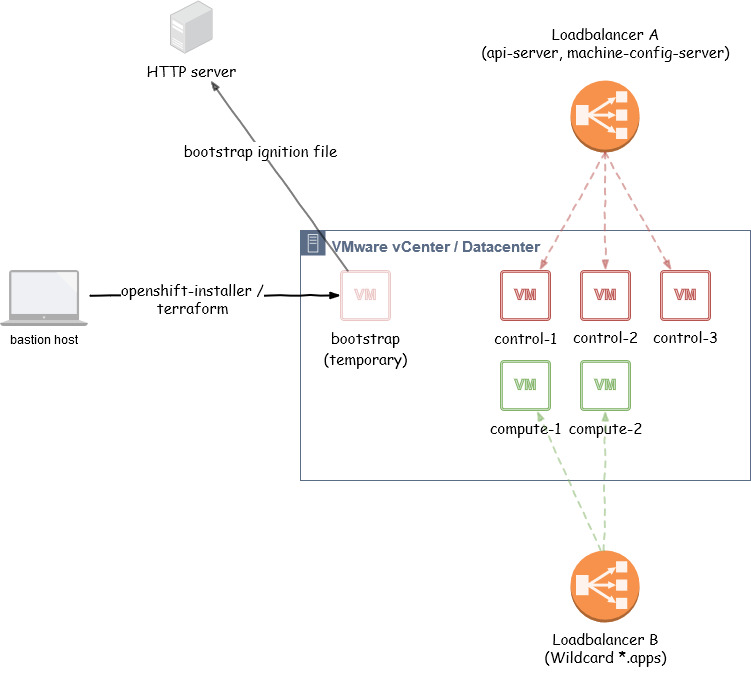
(Loadbalancer A and Loadbalancer B can reside on the same hard-/software dispatcher)
Let’s talk about some very important prerequisites for a smooth installation. The most important point will be the DNS configuration.
First of all, lets define an OCP cluster id. This id (string) will be relevant for the DNS configuration. Keep in mind that OpenShift 4 has a concept of a “clusterid” that will be incorporated into your clusters DNS records. Your DNS records will all have <clusterid>.<basedomain> in them. In other words, your “cluster id” will end up being part of your FQDN. Read the official documentation for more information.
We’ll use ocp4-cluster-001 as a cluster id.
So later on, a node’s fqdn will be composed of a node name, the cluster id an the base domain:
<node>.<clusterid>.<basedomain>
Sample host name (FQDN): compute-0.ocp4-cluster-001.int.consol.de
The base domain is the subdomain, where your nodes will be placed in. The name depends on your infrastructure.
Our base domain: int.consol.de
Proper DNS setup is imperative for a successful OpenShift installation. DNS is used for name resolution (A records), certificate generation (PTR records), and service discovery (SRV records).
Our DNS configuration:
# BOOTSTRAP NODE
bootstrap.ocp4-cluster-001.int.consol.de has address 10.0.5.58

# MASTER / CONTROL PLANE NODES
control-plane-0.ocp4-cluster-001.int.consol.de has address 10.0.5.59
control-plane-1.ocp4-cluster-001.int.consol.de has address 10.0.5.60
control-plane-2.ocp4-cluster-001.int.consol.de has address 10.0.5.61

# WORKER NODES
compute-0.ocp4-cluster-001.int.consol.de has address 10.0.5.62
compute-1.ocp4-cluster-001.int.consol.de has address 10.0.5.63

# LOADBALANCER
lb.ocp4-cluster-001.int.consol.de has address 10.0.5.64For the fully automated VM provisioning, we’ll use an infrastructure-as-code tool called terraform. Take care of the version - currently only version 11.x of terraform is working with the installer github template. Version 12.x will most likely fail (at the time of writing).
Link: https://www.terraform.io/downloads.html
Quick setup:
$ mkdir ~/bin
$ cd /tmp/
$ export TERRAFORM_VERSION=0.11.14
$ curl -O -L https://releases.hashicorp.com/terraform/${TERRAFORM_VERSION}/terraform_${TERRAFORM_VERSION}_linux_amd64.zip
$ unzip terraform_${TERRAFORM_VERSION}_linux_amd64.zip -d ~/bin/
$ terraform -v
Terraform v0.11.14
govc is a VMware/vSphere CLI. For faster deployment of an OVA Image, we will use govc. Alternatively you can deploy the template manually via vSphere web console.
Link: https://github.com/vmware/govmomi/tree/master/govc
Quick setup:
$ mkdir ~/bin
$ export GOVC_URL=https://github.com/vmware/govmomi/releases/download/v0.22.1/govc_linux_amd64.gz
$ curl -L ${GOVC_URL} | gunzip > ~/bin/govc
$ chmod +x ~/bin/govc
$ govc version
govc 0.22.1Since our CoreOS based VMs will be configured automatically, we have to provide a ssh public key to be able to log on to the nodes via ssh as user core.
Generate a ssh private key:
$ ssh-keygen -f ~/.ssh/id_rsa_ocp4_vcenterUse the generated ssh public key ~/.ssh/id_rsa_ocp4_vcenter.pub for the installation.
As loadbalancer for our POC setup, we will use a HAProxy on a CentOS VM. Don’t do this in production environments!
Our loadbalancer will listen on network address lb.ocp4-cluster-001.int.consol.de:<ports>.
$ yum install haproxy -yThis configuration will add the following load balancer entries to HA-Proxy:
Add the following configuration lines to /etc/haproxy/haproxy.cfg:
(replace the IP addresses!)
frontend openshift-api-server
    bind *:6443
    default_backend openshift-api-server
    mode tcp
    option tcplog

backend openshift-api-server
    balance source
    mode tcp
    server bootstrap 10.0.5.58:6443 check
    server control-plane-0 10.0.5.59:6443 check
    server control-plane-1 10.0.5.60:6443 check
    server control-plane-2 10.0.5.61:6443 check

frontend machine-config-server
    bind *:22623
    default_backend machine-config-server
    mode tcp
    option tcplog

backend machine-config-server
    balance source
    mode tcp
    server bootstrap 10.0.5.58:22623 check
    server control-plane-0 10.0.5.59:22623 check
    server control-plane-1 10.0.5.60:22623 check
    server control-plane-2 10.0.5.61:22623 check

frontend ingress-http
    bind *:80
    default_backend ingress-http
    mode tcp
    option tcplog

backend ingress-http
    balance source
    mode tcp
    server compute-0 10.0.5.62:80 check
    server compute-1 10.0.5.63:80 check

frontend ingress-https
    bind *:443
    default_backend ingress-https
    mode tcp
    option tcplog

backend ingress-https
    balance source
    mode tcp
    server compute-0 10.0.5.62:443 check
    server compute-1 10.0.5.63:443 check
Please ensure, that no services are listening on port 80 or 443 on your HAproxy machine (e.g. lsof -i:80 or ss -lnt sport = :80)
Restart HA-Proxy: systemctl restart haproxy
(optional) Enable haproxy service for permanent use: systemctl enable haproxy
For serving the ignition file of the bootstrap node, we will setup a simple HTTP server on port 8080 on our loadbalancer host (lb.ocp4-cluster-001.int.consol.de).
$ yum install httpd -yIn /etc/httpd/conf/httpd.conf, change the listen port from Listen 80 to Listen 8080.
Restart httpd: systemctl restart httpd
For installing Red Hat OpenShift Container Platform 4.3, you’ll need a pull secret:
Link: https://cloud.redhat.com/openshift/install/vsphere/user-provisioned
From https://mirror.openshift.com/pub/openshift-v4/clients/ocp/latest/, fetch the appropriate openshift-installer version and extract the binary to ~/bin/, e.g. openshift-install-linux-4.3.0.tar.gz.
From https://mirror.openshift.com/pub/openshift-v4/clients/ocp/latest/, fetch the appropriate oc version and extract the binary to ~/bin/, e.g. openshift-client-linux-4.3.0.tar.gz.
For a fully automated provisioning of your VMs on VMware vSphere, you’ll need an vCenter account with the appropriate permissions and information:
A ressource group will be generated automatically and named like your OCP cluster id.
The base image for all our CoreOS VMs will be a Red Hat CoreOS Image 4.3. This image can be found here:
https://mirror.openshift.com/pub/openshift-v4/dependencies/rhcos/4.3/4.3.0/rhcos-4.3.0-x86_64-vmware.ova
The first step of the installation is to upload the OVA image to our vCenter datacenter and mark it as a template. All CoreOS VMs will be cloned from this template.
Ensure you have the correct image downloaded:
$ ls -la rhcos-4.3.0-x86_64-vmware.ova
-rw-rw-r-- 1 zisis zisis 829542400 Jan 27 12:59 rhcos-4.3.0-x86_64-vmware.ova
Set govc environment variables if you want to upload the image via govc. Alternatively you can upload the image via vCenter web console.
export GOVC_URL='ocp-vcenter.int.consol.de'
export GOVC_USERNAME='administrator@vsphere.local'
export GOVC_PASSWORD='mypassword'
export GOVC_INSECURE=1
export GOVC_DATASTORE='vsanDatastore'
Check if your login works:
$ govc about
Name:         VMware vCenter Server
Vendor:       VMware, Inc.
Version:      6.7.0
...
Upload OVA image and mark as template. The name (rhcos-4.3.0) is important for later use, since we will reference the name of the template in our terraform plan (terraform.tfvars).
Pull spec:
$ govc import.spec /home/zisis/rhcos-4.3.0-x86_64-vmware.ova | python -m json.tool > rhcos.jsonCustomize the Network you want to use in rhcos.json:
"NetworkMapping": [
    {
        "Name": "VM Network",
        "Network": "VM Network"
    }
List resource pools:
$ govc find / -type p
/Datacenter/host/cluster001/Resources
/Datacenter/host/openshift-test-esx-3.int.consol.de/Resources
Upload the rhcos-4.3.0 image to the resource pool:
$ govc import.ova -options=./rhcos.json -name=rhcos-4.3.0 \
 -pool=/Datacenter/host/cluster001/Resources  /home/zisis/rhcos-4.3.0-x86_64-vmware.ova
[27-01-20 17:27:21] Uploading disk.vmdk... OK
Mark the VM as a template:
$ govc vm.markastemplate vm/rhcos-4.3.0The following steps will:
For the install-config.yaml, you need the following input:
Commands:
$ mkdir ocpinstall
$ cd ocpinstall

# create an install-config.yaml
$ cat <<EOF > install-config.yaml
apiVersion: v1
baseDomain: int.consol.de
metadata:
  name: ocp4-cluster-001
platform:
  vSphere:
    vcenter: ocp-vcenter.int.consol.de
    username: administrator@vsphere.local
    password: mypassword
    datacenter: Datacenter
    defaultDatastore: vsanDatastore
pullSecret: '{"auths":{"cloud.openshift.com":{"auth":"........"}}}'
sshKey: ssh-rsa AAAAB3N.....
EOF

# make a backup
$ cp install-config.yaml install-config.`date '+%s'`.bak

# create ignition configs
$ openshift-install create ignition-configs
INFO Consuming "Install Config" from target directory
Now you should have a directory structure like this:
$ tree
.
├── auth
│   ├── kubeadmin-password
│   └── kubeconfig
├── bootstrap.ign
├── install-config.1579194442.bak
├── master.ign
├── metadata.json
└── worker.ign
Caveat: ignition files are valid for 24 hours - so if your installation takes longer than 24 hours due to issues, you have to generate new ignition files.
Copy the generated bootstrap.ign file to your HTTP server and ensure, that the file can be downloaded with http:
Copy:
$ scp bootstrap.ign http-user@lb.ocp4-cluster-001.int.consol.de:/var/www/html/Check, if download would succeed from your http server:
$ curl -I http://lb.int.consol.de:8080/bootstrap.ign
HTTP/1.1 200 OK
...For the installation, we will use a modified version of the UPI vSphere installer, which is available at:
https://github.com/openshift/installer/tree/master/upi/vsphere
Clone the repo and change to the upi vSphere directory:
$ git clone https://github.com/openshift/installer.git
$ cd installer/upi/vsphere
Copy the example file to terraform.tfvars an adjust the variables.
In sections control_plane_ignition / END_OF_MASTER_IGNITION and compute_ignition / END_OF_WORKER_IGNITION, insert / copy&paste the contents of the ignitions files (master and worker) we generated before:
Our terraform.tfvars:
cluster_id = "ocp4-cluster-001"
cluster_domain = "ocp4-cluster-001.int.consol.de"
base_domain = "int.consol.de"
vsphere_server = "ocp-vcenter.int.consol.de"
vsphere_user = "administrator@vsphere.local"
vsphere_password = "mypassword"
vsphere_cluster = "cluster001"
vsphere_datacenter = "Datacenter"
vsphere_datastore = "vsanDatastore"
vm_template = "rhcos-4.3.0"
machine_cidr = "10.0.5.0/24"

vm_network = "VM Network"

control_plane_count = 3
compute_count = 2

bootstrap_ignition_url = "http://lb.int.consol.de:8080/bootstrap.ign"

control_plane_ignition = <<END_OF_MASTER_IGNITION
{"ignition":{"config":{"append":[{"source":"https://api-int.ocp4-cluster-001.int.consol.de:22623/config/master","verification":{}....
END_OF_MASTER_IGNITION

compute_ignition = <<END_OF_WORKER_IGNITION
{"ignition":{"config":{"append":[{"source":"https://api-int.ocp4-cluster-001.int.consol.de:22623/config/worker","verification":{}} ....
END_OF_WORKER_IGNITION

# put your static IPs in here
bootstrap_ip = "10.0.5.58"
control_plane_ips = ["10.0.5.59", "10.0.5.60", "10.0.5.61"]
compute_ips = ["10.0.5.62", "10.0.5.63"]
Modify the file main.tf and delete or comment out the module "dns" part, since we do not want to use Route53/AWS as DNS provider:
// module "dns" {
//   source = "./route53"
//
//   base_domain         = "${var.base_domain}"
//   cluster_domain      = "${var.cluster_domain}"
//   bootstrap_count     = "${var.bootstrap_complete ? 0 : 1}"
//   bootstrap_ips       = ["${module.bootstrap.ip_addresses}"]
//   control_plane_count = "${var.control_plane_count}"
//   control_plane_ips   = ["${module.control_plane.ip_addresses}"]
//   compute_count       = "${var.compute_count}"
//   compute_ips         = ["${module.compute.ip_addresses}"]
// }
Next steps will be to configure DNS and network gateway, if needed:
machine/ignition.tf:
...
DNS1=10.0.0.8
...After all prerequisites are done, let’s install OpenShift…
Change into the vsphere installer directory, where you modified the terraform files (*.tf):
$ cd installer/upi/vsphereInit, plan and apply our terraform plan, which will set up our VMs and start the OpenShift installation:
$ terraform init
...
$ terraform plan
...
$ terraform apply -auto-approve
...
module.compute.vsphere_virtual_machine.vm[1]: Creation complete after 4m45s (ID: 4217b49d-a6f9-b259-1dde-ba3bb32034e8)
module.control_plane.vsphere_virtual_machine.vm[2]: Creation complete after 4m45s (ID: 4217718d-32af-d4a3-86d2-96ed35bbe309)
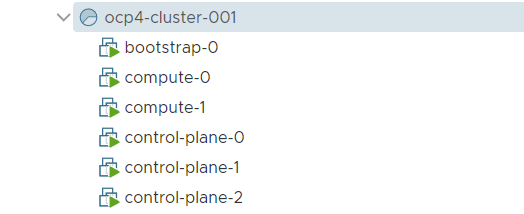
Apply complete! Resources: 8 added, 0 changed, 0 destroyed.Now you should see popping up some VMs in your vCenter:
In this phase, the bootstrap node is set up, which in turn will setup the cluster:
$ cd ~/ocpinstall/
$ openshift-install --dir=. wait-for bootstrap-complete --log-level debug
DEBUG OpenShift Installer v4.3.0
DEBUG Built from commit 2055609f95b19322ee6cfdd0bea73399297c4a3e
INFO Waiting up to 30m0s for the Kubernetes API at https://api.ocp4-cluster-001.int.consol.de:6443...
DEBUG Still waiting for the Kubernetes API: the server could not find the requested resource
...
DEBUG Still waiting for the Kubernetes API: the server could not find the requested resource
DEBUG Still waiting for the Kubernetes API: Get https://api.ocp4-cluster-001.int.consol.de:6443/version?timeout=32s: EOF
INFO API v1.16.2 up
INFO Waiting up to 30m0s for bootstrapping to complete...

DEBUG Bootstrap status: complete
INFO It is now safe to remove the bootstrap resources
...
If you want to see more details about installers progress, you can start a tail -f on ~/ocpinstall/.openshift_install.log.
Since the bootstrap node has given control over to the forming cluster, we can remove the bootstrap node:
$ cd installer/upi/vsphere
$ terraform apply -auto-approve -var 'bootstrap_complete=true'
After the bootstrap node was removed, you can adjust your loadbalancer and remove the bootstrap node from your dispatcher configuration.
The OCP4 cluster will continue to finish its installation by using a lot of cool operators:
$ cd ~/ocpinstall/
$ openshift-install --dir=. wait-for install-complete
INFO Waiting up to 30m0s for the cluster at https://api.ocp4-cluster-001.int.consol.de:6443 to initialize...


INFO Waiting up to 10m0s for the openshift-console route to be created...
INFO Install complete!
INFO To access the cluster as the system:admin user when using 'oc', run 'export KUBECONFIG=/home/zisis/ocpinstall/auth/kubeconfig'
INFO Access the OpenShift web-console here: https://console-openshift-console.apps.ocp4-cluster-001.int.consol.de
INFO Login to the console with user: kubeadmin, password: AHTUN-2vGkj-Fo0Ba-Ctae9
A new star is born.
For being able to execute oc commands, you have to use the kubeconfig, which was generated by the installer. You either use this kubeconfig by exporting the environment variable KUBECONFIG or copy the file auth/kubeconfig to your home directory in .kube/config (be sure not to overwrite any other kubeconfig):
$ export KUBECONFIG=~/ocpinstall/auth/kubeconfigor
$ cp ~/ocpinstall/auth/kubeconfig ~/.kube/configWait for cluster operators to get ready:
$ oc get clusteroperators
NAME                                       VERSION   AVAILABLE   PROGRESSING   DEGRADED   SINCE
authentication                             4.3.0     True        False         False      26h
cloud-credential                           4.3.0     True        False         False      27h
cluster-autoscaler                         4.3.0     True        False         False      26h
console                                    4.3.0     True        False         False      26h
dns                                        4.3.0     True        False         False      26h
image-registry                             4.3.0     True        False         False      26h
ingress                                    4.3.0     True        False         False      26h
insights                                   4.3.0     True        False         False      26h
kube-apiserver                             4.3.0     True        False         False      26h
kube-controller-manager                    4.3.0     True        False         False      26h
kube-scheduler                             4.3.0     True        False         False      26h
machine-api                                4.3.0     True        False         False      26h
machine-config                             4.3.0     True        False         False      26h
marketplace                                4.3.0     True        False         False      26h
monitoring                                 4.3.0     True        False         False      26h
network                                    4.3.0     True        False         False      26h
node-tuning                                4.3.0     True        False         False      26h
openshift-apiserver                        4.3.0     True        False         False      26h
openshift-controller-manager               4.3.0     True        False         False      26h
openshift-samples                          4.3.0     True        False         False      26h
operator-lifecycle-manager                 4.3.0     True        False         False      26h
operator-lifecycle-manager-catalog         4.3.0     True        False         False      26h
service-ca                                 4.3.0     True        False         False      26h
service-catalog-apiserver                  4.3.0     True        False         False      26h
service-catalog-controller-manager         4.3.0     True        False         False      26h
storage                                    4.3.0     True        False         False      26h
Check your nodes:
$ oc get nodes
NAME              STATUS    ROLES     AGE          VERSION
compute-0         Ready     worker    8m2s         v1.14.6+cebabbf4a
compute-1         Ready     worker    7m54s        v1.14.6+cebabbf4a
control-plane-0   Ready     master    10m13s       v1.14.6+cebabbf4a
control-plane-1   Ready     master    11m26s       v1.14.6+cebabbf4a
control-plane-2 Ready master 10m54s v1.14.6+cebabbf4aIn order to complete the installation, you need to add storage to the image registry. For test setups, you can set this to emptyDir (for more permanent storage, please see the official documentation for more information). So after a successful installation, only the image registry operator should be running in the openshift-image-registry namespace:
$ oc get pods -n openshift-image-registry
NAME                                              READY     STATUS    RESTARTS   AGE
cluster-image-registry-operator-f9697f69d-n47j8   2/2       Running   0          62s
Patch the image registry operator to use an emptyDir as storage:
$ oc patch configs.imageregistry.operator.openshift.io cluster --type merge --patch '{"spec":{"storage":{"emptyDir":{}}}}'
config.imageregistry.operator.openshift.io/cluster patched
(for OCP 4.3)
When there is no Object Storage available at initial setup of the registry, you will have to set manually the managementState for OpenShift bringing up the image registry successfully, see https://docs.openshift.com/container-platform/4.3/registry/configuring-registry-storage/configuring-registry-storage-vsphere.html#registry-removed_configuring-registry-storage-vsphere:
$ oc patch configs.imageregistry.operator.openshift.io cluster --type merge --patch '{"spec":{"managementState": "Managed"}}'
config.imageregistry.operator.openshift.io/cluster patched
Now you should see the registry coming up:
$ oc get pods -n openshift-image-registry
NAME                                              READY     STATUS              RESTARTS   AGE
cluster-image-registry-operator-f9697f69d-n47j8   2/2       Running             0          3m54s
image-registry-7766c98447-pgdwp                   0/1       ContainerCreating   0          65s
image-registry-9fd47f8fb-gs5kc                    0/1       ContainerCreating   0          65s
node-ca-2g5j9                                     0/1       ContainerCreating   0          66s
node-ca-2l85v                                     0/1       ContainerCreating   0          66s
node-ca-798mx                                     0/1       ContainerCreating   0          66s
node-ca-nmrhw                                     0/1       ContainerCreating   0          66s
node-ca-wcp5g 0/1 ContainerCreating 0 66sIf you want to remove the cluster, you can use the terraform destroy command:
$ cd installer/upi/vsphere
$ terraform destroy -auto-approveSince your VMware administrator will ask you for sure about the required permissions for the installation, maybe this is a good list to start the discussion. I’m sure, not all of these permissions are needed for the installation, so if you have time, strip it down ;)
vSphere roles / permissions:
Datastore
   Allocate space
   Low level file operations

Folder
   Create folder
   Delete folder

Network
   Assign network

Resource
   Assign vApp to resource pool
   Assign virtual machine to resource pool
   Create resource pool
   Remove resource pool

vApp
   Clone
   View OVF environment
   vApp application configuration
   vApp instance configuration
   vApp resource configuration

Virtual machine
   Change Configuration
       Acquire disk lease
       Add existing disk
       Add new disk
       Add or remove device
       Advanced configuration
       Change CPU count
       Change Memory
       Change Settings
       Change Swapfile placement
       Change resource
       Configure Host USB device
       Configure Raw device
       Configure managedBy
       Display connection settings
       Extend virtual disk
       Modify device settings
       Query Fault Tolerance compatibility
       Query unowned files
       Reload from path
       Remove disk
       Rename
       Reset guest information
       Set annotation
       Toggle disk change tracking
       Toggle fork parent
       Upgrade virtual machine compatibility
   Edit Inventory
       Create from existing
       Create new
       Move
       Register
       Remove
       Unregister
   Guest operations
       Guest operation alias modification
       Guest operation alias query
       Guest operation modifications
       Guest operation program execution
       Guest operation queries
   Interaction
       Answer question
       Backup operation on virtual machine
       Configure CD media
       Configure floppy media
       Connect devices
       Console interaction
       Create screenshot
       Defragment all disks
       Drag and drop
       Guest operating system management by VIX API
       Inject USB HID scan codes
       Install VMware Tools
       Pause or Unpause
       Perform wipe or shrink operations
       Power off
       Power on
       Record session on virtual machine
       Replay session on virtual machine
       Reset
       Resume Fault Tolerance
       Suspend
       Suspend Fault Tolerance
       Test failover
       Test restart Secondary VM
       Turn off Fault Tolerance
       Turn on Fault Tolerance
   Provisioning
       Allow disk access
       Allow file access
       Allow read-only disk access
       Allow virtual machine download
       Allow virtual machine files upload
       Clone template
       Clone virtual machine
       Create template from virtual machine
       Customize guest
       Deploy template
       Mark as template
       Mark as virtual machine
       Modify customization specification
       Promote disks
Read customization specificationsIf you have any questions or remarks, feel free to contact me via zisis(dot)lianas(at)consol(dot)de or Twitter.
If you need professional OpenShift support, visit us at https://www.consol.de/it-consulting/openshift/.