


When developing software that exchanges data with other components or services you may be confronted with the proper simulation of those foreign services during integration testing. This is because you need to connect with a foreign service
that is simply not available on your local machine or in a test environment.
For unit testing purpose you can use mocks that help out to simulate proper responses. There will be times where your software is deployed to a test environment
in order to perform some acceptance tests with your stakeholders before going to a final release. Usually this is also done with the customer exploring the software through manual testing. In these situations traditional service mocking is not
a good option and you need a real simulator instance that receives requests and responds with proper test data.
This is exactly what the Citrus simulator project provides for you. Standalone simulation and complex request/response processing with solid validation capabilities. The Citrus simulator provides a very easy and reliable definition of inbound and outbound messages for different scenarios.
Good news is that this is not only for Http REST interfaces but also for SOAP WebService, JMS, RMI, mail messaging and many more. So you can use the simulator whenever you need to integrate with another service that is simply not available on your local machine or in your test environment.
The citrus-simulator project is a side project of the test framework Citrus. The simulator uses Citrus to define server APIs and the logic to respond with predefined messages according to
defined scenarios.
In general the simulator is nothing but a normal Spring Boot web application that you can start on your local machine. The simulator waits for incoming requests and each request executes a predefined scenario that will create a response message for the client.
Which scenario to execute is identified based on a mapping key that is extracted from the incoming request.
Let’s have a simple example project to demonstrate the simulator concepts.
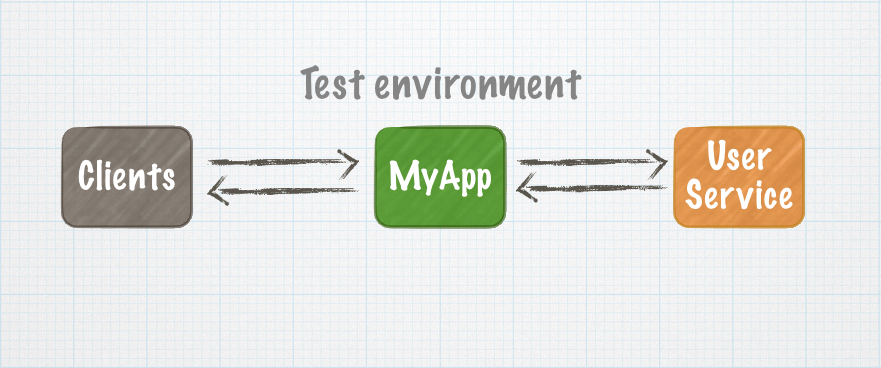
Let’s say you are in charge of developing an application that connects with a user login service for proper authentication. Your service comes as a Microservice web application and is ready for deployment in the acceptance test environment.
Unfortunately the user authentication service is not ready yet and is not deployed in that test environment. Without the user
login service your application is not able to work properly as each user interaction needs to be authenticated with foreign service calls first.
This means the foreign user login service needs to be simulated so users can explore your application in that test environment.
We start to simulate that user login service by creating a new Spring Boot project. Of course you can use any build system you like when building the simulator application. Most popular tools would be Gradle or Maven.
Here we show how to setup everything using Gradle.
buildscript {
    repositories {
        mavenCentral()
    }
    dependencies {
        classpath("org.springframework.boot:spring-boot-gradle-plugin:1.5.6.RELEASE")
    }
}

apply plugin: 'java'
apply plugin: 'eclipse'
apply plugin: 'idea'
apply plugin: 'org.springframework.boot'

jar {
    group = "com.consol.citrus.simulator"
    baseName = 'user-login-simulator'
    version =  '1.0.0'
}

repositories {
    mavenCentral()
}

sourceCompatibility = 1.8
targetCompatibility = 1.8

dependencies {
    compile("org.springframework.boot:spring-boot-starter")
    compile("org.springframework.boot:spring-boot-starter-web")
    compile("com.consol.citrus:citrus-simulator-starter:1.0.0")
    compile("com.consol.citrus:citrus-simulator-ui:1.0.0")
    testCompile("junit:junit")
}
The build script defines a typical Spring Boot project with its dependencies and plugin configuration. In addition to that we add the citrus-simulator-starter dependency. The citrus-simulator-ui dependency is optional
and provides a detailed Angular2 user interface that you can open with your browser once the simulator is up and running.
Let’s add the Spring Boot main class for the application com.consol.citrus.simulator.Simulator.java:
package com.consol.citrus.simulator;

@SpringBootApplication
public class Simulator extends SimulatorRestAdapter{

    public static void main(String[] args) {
        SpringApplication.run(Simulator.class, args);
    }

    @Override
    public String urlMapping(SimulatorRestConfigurationProperties simulatorRestConfiguration) {
        return "/services/rest/v1/**";
    }

    @Override
    public EndpointAdapter fallbackEndpointAdapter() {
        return new StaticEndpointAdapter() {
            @Override
            protected Message handleMessageInternal(Message message) {
                return new HttpMessage().status(HttpStatus.INTERNAL_SERVER_ERROR);
            }
        };
    }
}
The main class is a typical Spring Boot application that uses @SpringBootApplication annotation with auto configuration of needed components. As we have added the citrus-simulator-starter dependency to the project we also get auto
configuration of all simulator related beans and components. The application can use a SimulatorRestAdapter extension in order to overwrite some simulator components such as the default fallbackEndpointAdapter. This adapter defines a
default Http 500 internal server error response when something went wrong on the simulator request processing. Also we give the url mapping that defines how clients connect with the user login REST API later on using the base
URL http://localhost:8080/services/rest/v1/**.
Now we can add a first a default scenario that responds to incoming requests.
package com.consol.citrus.simulator;

import com.consol.citrus.http.message.HttpMessage;
import com.consol.citrus.simulator.scenario.*;
import org.springframework.http.HttpStatus;

@Scenario("DEFAULT_SCENARIO")
public class DefaultScenario extends AbstractSimulatorScenario {

    @Override
    public void run(ScenarioDesigner designer) {
        designer.send()
                .message(new HttpMessage("No scenario found for this request")
                        .status(HttpStatus.NOT_FOUND));
    }
}
The scenario uses the annotation @Scenario("DEFAULT_SCENARIO") and extends AbstractSimulatorScenario. In the run method we can use the Citrus Java DSL designer to create some response generating logic.
This default scenario is activated when no other scenario is matching the incoming request. So we send back a Http 404 NOT FOUND as we obviously did not match a scenario. Now let’s build and start the simulator application.
You can build and run the simulator application from command line using the Gradle binaries.
./gradlew build bootRunYou will see the application starting up. Usually you will see some console log output. The web server should start within seconds. Once the application is up and running
you can open your browser and point to http://localhost:8080. You will see the simulator user interface.
You can access the simulated REST services on http://localhost:8080/services/rest/. Up to now we only have the default scenario so we constantly get Http 404 NOT FOUND responses.
Let’s add some scenarios representing the user login service.
The user login service defines following REST API:
{
  "swagger": "2.0",
  "info": {
    "description": "This is a user login service",
    "version": "1.0.0",
    "title": "User Login Service"
  },
  "host": "user-login-service",
  "basePath": "/v1",
  "schemes": [
    "http"
  ],
  "paths": {
    "/user": {
      "post": {
        "operationId": "createUser",
        "produces": [
          "application/xml",
          "application/json"
        ],
        "parameters": [
          {
            "in": "body",
            "name": "body",
            "description": "Created user object",
            "required": true,
            "schema": {
              "$ref": "#/definitions/User"
            }
          }
        ],
        "responses": {
          "default": {
            "description": "successful operation"
          }
        }
      }
    },
    "/user/login": {
      "get": {
        "operationId": "loginUser",
        "produces": [
          "application/xml",
          "application/json"
        ],
        "parameters": [
          {
            "name": "username",
            "in": "query",
            "description": "The user name for login",
            "required": true,
            "type": "string"
          },
          {
            "name": "password",
            "in": "query",
            "description": "The password for login in clear text",
            "required": true,
            "type": "string"
          }
        ],
        "responses": {
          "200": {
            "description": "successful operation",
            "schema": {
              "type": "string"
            },
            "headers": {
              "X-Rate-Limit": {
                "type": "integer",
                "format": "int32",
                "description": "calls per hour allowed by the user"
              },
              "X-Expires-After": {
                "type": "string",
                "format": "date-time",
                "description": "date in UTC when token expires"
              }
            }
          },
          "400": {
            "description": "Invalid username/password supplied"
          }
        }
      }
    },
    "/user/logout": {
      "get": {
        "operationId": "logoutUser",
        "produces": [
          "application/xml",
          "application/json"
        ],
        "parameters": [],
        "responses": {
          "default": {
            "description": "successful operation"
          }
        }
      }
    },
    "/user/{username}": {
      "get": {
        "operationId": "getUserByName",
        "produces": [
          "application/xml",
          "application/json"
        ],
        "parameters": [
          {
            "name": "username",
            "in": "path",
            "description": "The name that needs to be fetched. Use user1 for testing. ",
            "required": true,
            "type": "string"
          }
        ],
        "responses": {
          "200": {
            "description": "successful operation",
            "schema": {
              "$ref": "#/definitions/User"
            }
          },
          "400": {
            "description": "Invalid username supplied"
          },
          "404": {
            "description": "User not found"
          }
        }
      }
    }
  },
  "definitions": {
    "User": {
      "type": "object",
      "properties": {
        "id": {
          "type": "integer",
          "format": "int64"
        },
        "username": {
          "type": "string"
        },
        "password": {
          "type": "string"
        }
      },
      "xml": {
        "name": "User"
      }
    }
  }
}
There are 4 operations defined:
Let’s create basic scenarios for these operations in the simulator.
@Scenario("CREATE_USER")
@RequestMapping(value = "/services/rest/v1/user", method = RequestMethod.POST)
public class CreateUserScenario extends AbstractSimulatorScenario {

    @Override
    public void run(ScenarioDesigner scenario) {
        scenario
            .http()
            .receive()
            .post()
            .payload(new ClassPathResource("templates/user-control.json"));

        scenario
            .http()
            .send()
            .response(HttpStatus.OK);
    }
}
The scenario for Http POST requests on request path /v1/user uses the Spring @RequestMapping annotation. The simulator scenario mapper will automatically
route incoming requests to this scenario based on that information.
The scenario itself receives the incoming request using the Citrus Java DSL. The receive operation validates the Http POST request method and gives an expected control Json message body as external file resource. The
user-control.json defines the expected user object on this operation:
{
  "id": "@isNumber()@",
  "username": "@notEmpty()@",
  "password": "@notEmpty()@"
}
The control user object verifies that the elements id, username and password are present. In addition to that we can use Citrus validation matchers in order to validate the element values. The scenario produces a proper response
only in case the incoming request matches the expected control Json object. The simulator scenario is able to use the full Citrus validation power for comparing message data in Json, XML and plaintext message format. JsonPath and XPath expression evaluation and validation
is also possible here.
Now let’s define a proper response message for the scenario. We send back a Http 200 OK response. This is how the scenario is able to control the response generation with Citrus.
We continue with the remaining scenarios for all other operations defined in the REST API:
@Scenario("GET_USER")
@RequestMapping(value = "/services/rest/v1/user/{username}", method = RequestMethod.GET)
public class GetUserScenario extends AbstractSimulatorScenario {

    @Override
    public void run(ScenarioDesigner scenario) {
        scenario
            .http()
            .receive()
            .get();

        scenario
            .http()
            .send()
            .response(HttpStatus.OK)
            .payload(new ClassPathResource("random-user.json"));
    }
}
The get user operation needs to send back a proper user object in Json format. We can load an external file resource as message payload for that.
{
  "id": "citrus:randomNumber(10)",
  "username": "citrus:randomEnumValue('amy', 'penny', 'sheldon', 'leonard', 'rajesh', 'howard', 'bernadette')",
  "password": "citrus:randomString(10)"
}
The usage of Citrus functions makes it easy to create a random user object that meets the REST API object definitions. Let’s add the remaining login and logout scenarios.
@Scenario("USER_LOGIN")
@RequestMapping(value = "/services/rest/v1/user/login", method = RequestMethod.GET)
public class UserLoginScenario extends AbstractSimulatorScenario {

    @Override
    public void run(ScenarioDesigner scenario) {
        scenario
            .http()
            .receive()
            .get()
            .queryParam("@assertThat(allOf(containsString(username=),containsString(password=))@");

        scenario
            .http()
            .send()
            .response(HttpStatus.OK)
            .contentType("text/plain")
            .header("X-Rate-Limit", "10")
            .header("X-Expires-After", "citrus:currentDate(YYYY-MM-DD'T'hh:mm:ss, +1h)")
            .payload("citrus:randomString(40)");
    }
}
The login operation verifies the presence of Http query parameter username and password. As response the scenario defines some header information X-Rate-Limit and X-Expires-After where latter is the
expire date time one hour from now calculated with the Citrus function citrus:currentDate(YYYY-MM-DD'T'hh:mm:ss, +1h). As payload we send back a 40 character random token as plaintext string.
@Scenario("USER_LOGOUT")
@RequestMapping(value = "/services/rest/v1/user/logout", method = RequestMethod.GET)
public class UserLogoutScenario extends AbstractSimulatorScenario {

    @Override
    public void run(ScenarioDesigner scenario) {
        scenario
            .http()
            .receive()
            .get();

        scenario
            .http()
            .send()
            .response(HttpStatus.OK);
    }
}
Last not least the logout operation that completes the REST API for the user login service. Now the simulator is able to respond to all operations that are defined in the REST API. Clients are now able to call the
operations via Http REST. The simulator will verify the incoming request data and create proper response messages.
You can test the simulator by pointing your browser to the following URLs:
http://localhost:8080/services/rest/v1/user/test
http://localhost:8080/services/rest/v1/user/login?username=christoph&password=secr3t
http://localhost:8080/services/rest/v1/user/logout
You should always get proper Http 200 OK response messages. The login request should get a new login token in the response every time. In case we send some invalid request we should get Http 500 responses and for
unsupported request paths we should get a Http 404 response. Try that with following test URLs.
http://localhost:8080/services/rest/v1/unsupported
http://localhost:8080/services/rest/v1/user/login
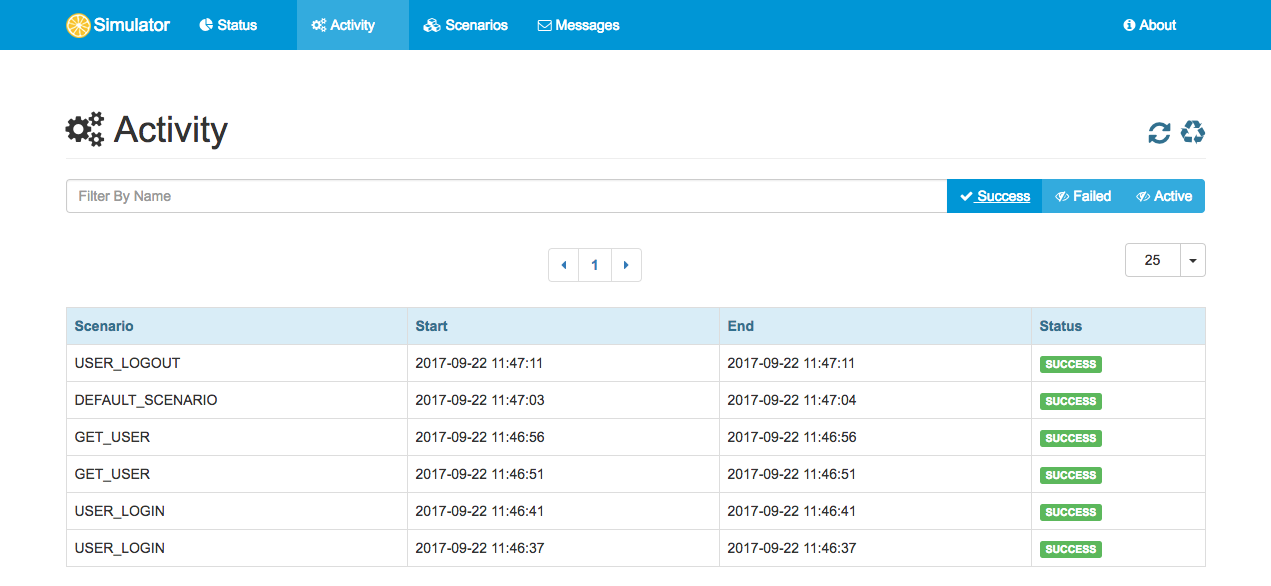
http://localhost:8080/services/rest/v1/user/login?username=pwd_missingWith the above test requests we triggered some activities on the simulator. Let’s review those activities in the web based user interface.
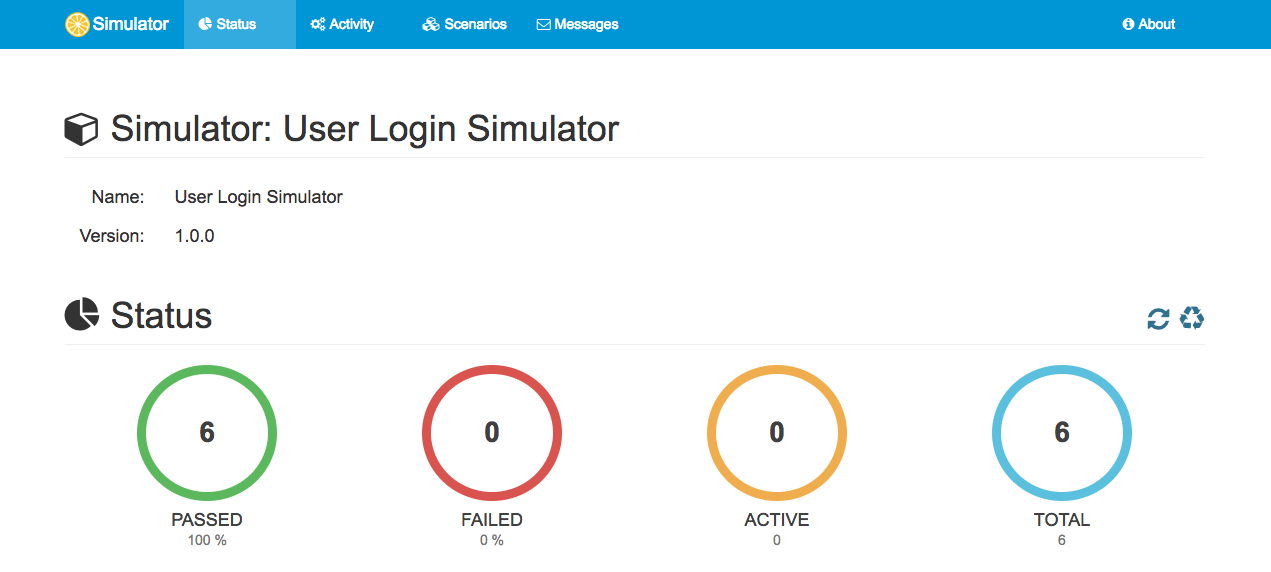
The simulator provides a web based Angular2 user interface so users can review the status and all activities on the simulator. We have already seen the dashboard that gives an overview of the simulator status:
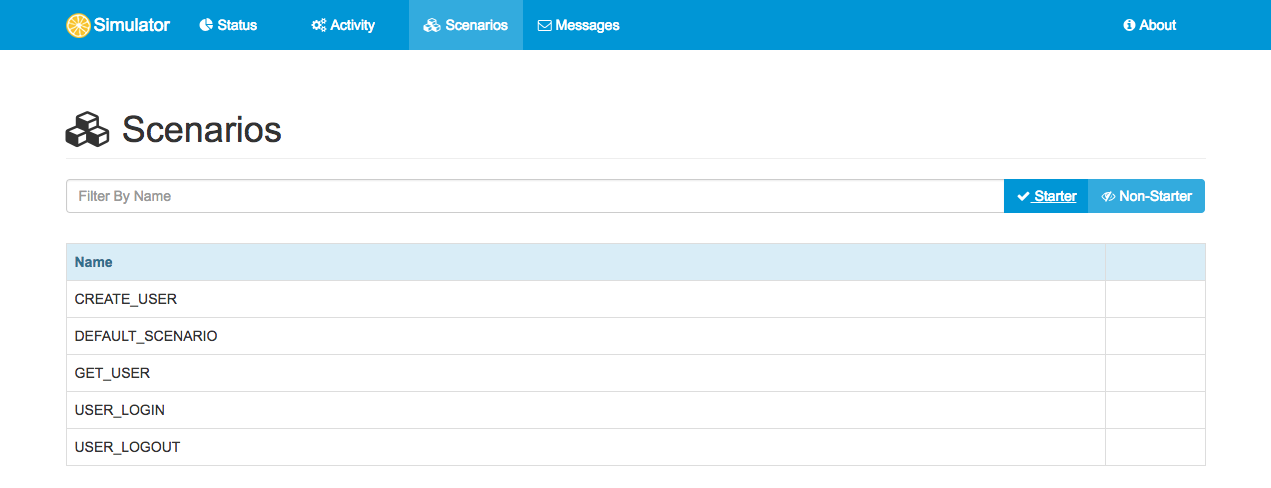
In addition to that you can view detailed information available scenarios and their execution activity.
Up to now we have added simulator scenarios manually. We could have also used auto generated scenarios based on the given Swagger Open API specification of the REST API. Just add a HttpScenarioGenerator bean
to the application:
package com.consol.citrus.simulator;

@SpringBootApplication
public class Simulator extends SimulatorRestAdapter{

    public static void main(String[] args) {
        SpringApplication.run(Simulator.class, args);
    }

    @Override
    public String urlMapping(SimulatorRestConfigurationProperties simulatorRestConfiguration) {
        return "/services/rest/v1/**";
    }

    @Override
    public EndpointAdapter fallbackEndpointAdapter() {
        return new StaticEndpointAdapter() {
            @Override
            protected Message handleMessageInternal(Message message) {
                return new HttpMessage().status(HttpStatus.INTERNAL_SERVER_ERROR);
            }
        };
    }

    @Bean
    public static HttpScenarioGenerator scenarioGenerator() {
        HttpScenarioGenerator generator = new HttpScenarioGenerator(
                new ClassPathResource("swagger/user-login-api.json"));

        generator.setContextPath("/services/rest");
        return generator;
    }
}
The HttpScenarioGenerator reads the Open API specification file at runtime and generates scenarios for each operation. The generated scenarios do also
verify the request data according to the rules defined in the specification. The response messages hold dynamic data objects generated from the API schema definitions.
The Citrus simulator project brings everything to manage standalone simulation of interfaces that you need to connect to during software development. The sample above showed REST API simulation. Same logic is possible with SOAP web services,
JMS and many other messaging transports. The integration with Citrus framework capabilities enables us to create even very complex scenarios with intermediate message handling and consecutive message calls as well as content based routing.
You can find the complete sample sources on github (https://github.com/citrusframework/citrus-simulator-demo). Also please explore all other simulator sample projects and find out how the simulator works best for you and your requirements.
Of course any feedback is very welcome!