


In the first article of this series, Getting started with AWS Lambda, we used a Cloudformation template to provision and deploy all needed parts for our REST application.
In this and the following articles, we are going to explore components used in the template. The focus of this article is the network infrastructure components.
What you will need:
A basic understanding of IPv4 Subnetting and CIDR notation
An AWS account
An SSH client
About 35-40 minutes of time
Attention
When following along with this article, you will deploy AWS resources. Amazon will charge you for those instances, which may cost some money. Although, we will delete all resources at the end.
Modern DevOps practices promote cross-functional teams, collaboration and trust while leading to faster release cycles and a faster time to market. The core idea is, as in many fields, automation. Instead of waiting for someone to provision the computational resources, configuring the network, etc., we let the system provision and deploy the needed resources for us. Different cloud platforms have different solutions to allow automated provisioning and/or deployment:
AWS Cloudformation for AWS
Helm for Kubernetes
Templates for OpenShift
Terraform by HashiCorp as a vendor-agnostic solution
The process of describing the provisioning and deployment in a machine-readable format is known as Infrastructure as Code.
In our first blog article, Getting started with AWS Lambda, we used an AWS Cloudformation template to provision and deploy the infrastructure needed.
If you have read the article, you may have taken a look at the Cloudformation template infra/createDeployment.yml. It defines the infrastructure of a small REST backend, enabling the automated deployment. Reading and understanding this template can be daunting at first: aside of the expected resources (Lambdas, an API-Gateway and a database-instance), we also find a manifold of other resources, such as permissions, roles, VPCs, Subnets… This manifold of resources can roughly be divided into two categories:
Permission management to grant rights or limit actions on a logical level, and
Network management to realize communication between computing resources.
We will focus on the latter point, i.e. the network management components. The permissions management components, as well as the creation of a template for deployment will be discussed in future articles of this series.
The core network component in AWS is the Virtual Private Cloud (or VPC for short). It lets us define a network in which the computing resources run. Remember that, even if we go Serverless, there are computing resources involved on which, for example, Lambdas are executed. Instead of deploying them directly, however, we let the underlying system, i.e. AWS, deploy them for us on the fly.
The VPC is configured with an IP address range in CIDR notation. If a resources is provisioned within a VPC, it gets an IP from the VPC’s address range assigned.
The VPC can further be subdivided into Subnets. Again, each Subnet is configured with an IP address range. Additionally, the IP address range of a Subnet must:
be a subset of the corresponding VPC’s Subnet and
not overlap with the IP range of other Subnets in the same VPC.
Why do we not create multiple VPCs, and subdivide a VPC in multiple Subnets instead? To understand this, we need some background information on how Amazon organizes its data centers. The largest organizational unit in which data centers are divided are regions.

(Source)
Each orange circle in the image above represents a region. White circles show regions that will be accessible soon. The numbers within the orange circles shows the number of availability zones within a region. We will discuss Availability Zones further below. Regions fulfill four important roles: First, when providing a solution through AWS, you can deploy the solution in a region close to your end users, allowing for a better experience due to lower latency. Second, since regions are typically far apart, a major event is unlikely to hit all regions at once, providing resilience on a macro scale. Third, you can go global in minutes. If you want to reach a new market, you can deploy your solution an a region near the new market. Fourth, regions allow you, if needed, to conform to regional legislation. The list of available regions include, but are not limited to, North Virginia, Oregon, Mumbai, Tokyo, Beijing, Frankfurt and Sao Paolo.
Regions are further subdivided into availability zones (or AZ for short). Those are typically independent data centers. Their role is to improve resiliency. Location and infrastructure of each AZ is carefully chosen by Amazon such that an event affecting one AZ does not necessarily affect another AZ in the same region. The number of AZs per region varies, but each region has at least two AZs.
The benefit of such an infrastructure is obvious, but what does this have to do with VPCs and Subnets? VPCs are bound to a region, i.e. they exist in the region they were created in. Subnets, on the other hand, exist within one AZ. The corresponding AZ is configured when the Subnet is created. Thus, in order to improve resiliency, one can create one VPC with, for example, three Subnets, each in a different AZ, and deploy a database instance within each Subnet. If one AZ (and thus one database instance) fails, the other two instances stay unaffected.
To test what we have learned so far, we create a VPC and two Subnets, each in a different AZ. Go to the AWS Management Console and login if you are not yet logged in. You can see the region you are connected to in the upper right corner:

In the upper left, click on  , type
 VPC and press enter. Click Your VPCs on the left. You will most likely see that at least one VPC already exists (that is, if you created your AWS account after 2013-12-04). This is the default VPC that AWS created for your.
Create a new VPC by clicking on  near the top left. Fill out the form. The name tag should be sufficiently recognizable so you can identify the VPC later on, when we delete all created resources. For the CIDR, you can choose an IP range of your liking, but let us stick with the private class C IP address space
 192.168.0.0/16 for now. Leave all other settings as-is and click on  . On the next page, click
  . This will take you back to the overview, and you should now see your newly created VPC.
Next up, we create two Subnets within the VPC. For this, click Subnets right below Your VPCs on the left. Again, it is highly likely that you see at least one already existing Subnet, the default Subnet. Create a new Subnet by clicking  . Choose a name that is easy for you to recognize. In the
 VPC-dropdown, select the VPC you just created. In the Availability Zone dropdown, choose the first one for your region (for me, this is eu-west-1a). As IP address range specify 192.168.0.0/24. Click , then click on the next page. In the Subnet overview, you should now see your Subnet.
Create a second Subnet in the same VPC, but instead of the first AZ, choose the second AZ. Use192.168.1.0/24 as IP address range.
Now that your network is ready, we need some computational resources to start testing the setup. Click , type EC2 and hit enter. Then, on the left, click on Instances (not capitalized) and  at the top. On the next page,
Amazon Linux 2 AMI (HVM), SSD Volume Type and 64-bit (x86):

On the next page, select t2.micro as Instance Type:

Click  (do not click
  ) and configure:
Network: the VPC you created earlier
Subnet: the Subnet you created in the first AZ
Auto-assign public IP: Enable
and click . Review the settings and click  .
.
Note
AWS will ask you to provide an SSH key. If you have already created an SSH key in AWS, you can use the existing one. Otherwise select Create a new key pair and download public and private key. They are needed later on to connect to the started instances via SSH.
Clicking on  will take you back to the overview page. Tick the checkbox next to your created instance. If the instance state is “pending” and the checkbox is not available, wait a moment until the instance state switches to “running” and then tick the checkbox. This will open a summary of your instance at the bottom of the page. Write down the
 IPv4 public IP, we will need it in a moment.
Create a second instance with the same settings, but this time, provision it in the Subnet associated with the second availability zone. After creation, write down the public IP of this instance as well.
When the instances are online, try connecting to them via SSH. As username, use ec2-user, as host use the public IPs you wrote down. You will notice that no connection can be established. This is due to the fact that the VPC is not able to communicate with the Internet. Even though both EC2 instances have a public IP address, they are not reachable. To make the EC2 instances, and the VPC in general, reachable, we need to create an Internet Gateway.
Click on , type VPC and hit enter. On the left, select Internet Gateway (not Egress Only Internet Gateway). As before, you will see at least one already existing Internet Gateway that is associated with the default VPC provided by AWS. At the top of the page, click  , give it a name and click , then to go back to the overview page. When we observe the page carefully, we can see that the new Internet Gateway is not yet associated with an VPC. To change this, tick the checkbox next to your Internet Gateway, then click on
  ,
,  . From the dropdown menu, select your VPC and click
  .
.
What is left to do is to configure the VPC with a route, so it knows which traffic to route to the Internet Gateway. On the left, click on Route Tables and look for the route associated with your VPC. Tick the checkbox next to the route, then click ,  . On the following page, you will see that one route already exists. This route specifies how VPC-local traffic is routed: the destination is the IP address range of the VPC (
192.168.0.0/16), the destination is local, i.e. routing is done within the VPC. To allow traffic flow from and to the Internet, create a new route by clicking  . As destination provide
 0.0.0.0/0 (all traffic not covered by a more specific route), and as target choose the Internet Gateway you just created. When you are done, click  .
.
When you now try and connect to the EC2-instances, the connection will be successful.
Note
Keep in mind that AWS permits SSH connection only through SSH-Keys. Please configure your SSH client accordingly to use the SSH key provided/created earlier.
Now that we are connected to the two EC2-Instances, let us try to communicate from one instance to another. On both instances, execute ip addr to determine the (local) IPs of them and write them down. The instance in AZ 1 should have an IP similar to 192.168.0.x, whereas the instance in in AZ 2 should have an IP similar to 192.168.1.y.
Try pinging the EC2-instance in AZ 2 from the EC2-instance in AZ 1 (ec2-user@ip-192-168-0-x$ ping 192.168.1.y). We would expect some response signaling Layer 3 network connectivity between both instances. What we observe, however, is nothing. The command seems to be stuck. Canceling the ping (CTRL+C) reveals a 100% packet loss ratio.
A Security Group is a set of rules, which dictate what network traffic can and cannot pass to/from EC2 instances. In this terms, ingoing traffic is traffic going to an associated EC2 instance, outgoing traffic is traffic coming from an associated EC2 instance. Traffic that is not explicitly allowed, is denied. The special characteristic of Security GroupS is that they are stateful. If a packet is able to pass a Security Group, the answer will also be allowed to pass through. This hold true for both directions, i.e. it does not matter whether the initial packet comes from the associated EC2 instances or from the outside.
Every EC2 instance has exactly one associated Security Group, though a Security Group can be assigned to multiple EC2 instances. When you created the EC2-instances, AWS created a Security Group with a default ruleset for each of them.
To explore the Security Group of your EC2-instances, click on , type EC2 and hit enter. Now, on the next page you can click Security Groups on the left to get an overview of all Security Groups. However, I find that getting to the Security Group of one particular instance is easier by clicking Instances. In the overview, tick the checkbox next to the instance running in AZ 1. This will open a summary of this instance at the bottom of the page.
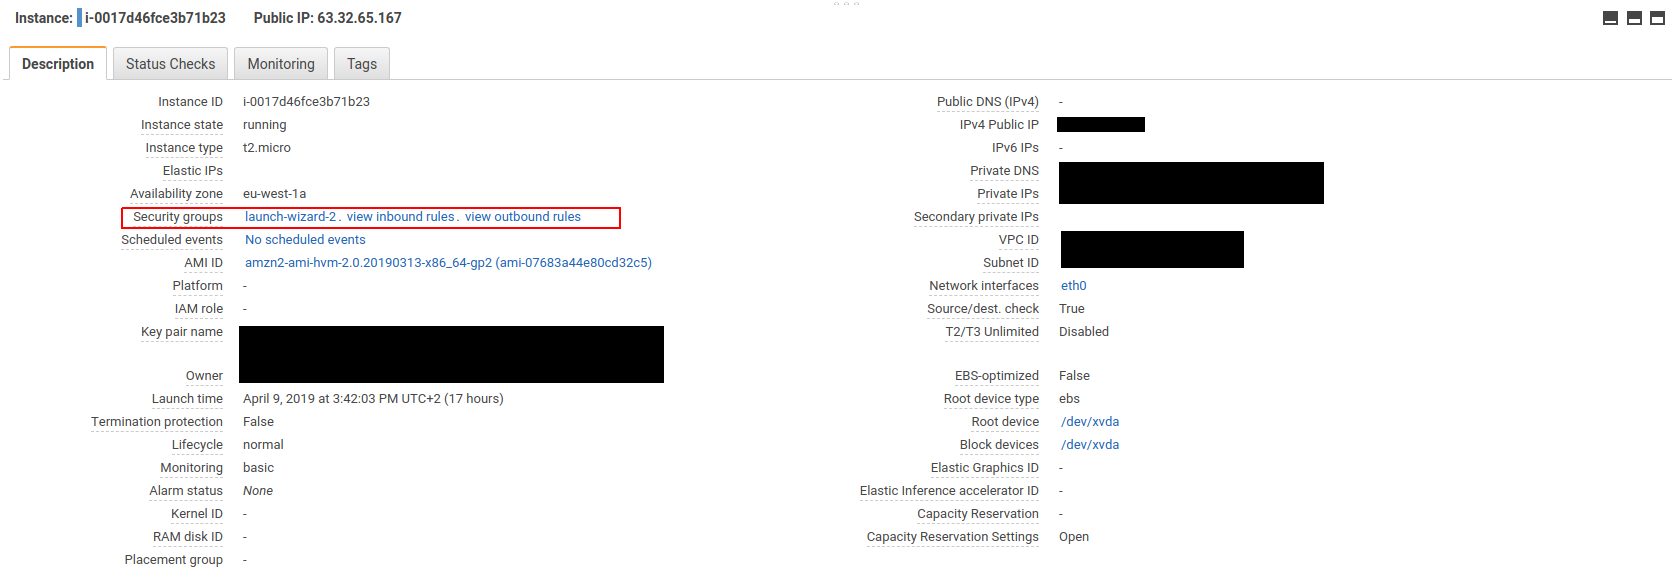
Clicking on the Security Group in this overview will take you directly to the Security Group. Let us inspect the Inbound and outbound rules.
In the inbound rules section, we see that a rule permitting SSH connections is present. If we were to look at the inbound rules of the Security Group of the second instance, we would see that it is configured identically. Now we can explain why our attempt to ping the EC2 instance in AZ 2 failed: there is no inbound rule permitting ICMP-messages to pass through to the EC2 instance in AZ 2.
Looking further at the outbound rules, we see a single rule permitting all outgoing traffic to all destinations. What would to happen, if we were to remove this rule? Would we still be able to connect via SSH?
Hint
Before you attempt to delete the outgoing rule, close the connection to the corresponding EC2 instance. In my experience, the SSH session likes to freeze when Security Group rules are deleted.
Delete the outgoing rule by clicking  , then
  and
and  . If you reconnect to the corresponding EC2 instance, the connection will be established. This demonstrates the stateful nature of Security Groups: even though there is no Outbound Rule (thus all outgoing traffic is blocked by default), a SSH connection can still be established, due to the inbound rule. Remove the outbound rule from the Security Group associated with the other EC2 instance as well, remember to close the SSH connection before you do so.
Now, lets think about the rules necessary to allow a ping from the EC2 instance in AZ 1 to the EC2 instance in AZ 2 to succeed. The package has to leave the instance in AZ 1 and enter the instance in AZ 2. Instead of allowing single IPs, we are going to allow a ping from an IP of the Subnet in AZ 1 to an IP in the Subnet in AZ 2 to succeed:
* In the Security Group of the instance in AZ 1, add the following outbound rule:
* Type: All ICMP - IPv4
* Destination: Custom - 192.168.1.0/24
* In the Security Group of the instance in AZ 2, add the following inbound rule:
* Type: All ICMP - IPv4
* Source: Custom - 192.168.0.0/24
When you now try to ping the EC2 instance in AZ 2 from the EC2 instance in AZ 1, you get a response. The other direction, however, is not working since the rules permitting the other direction are still missing. Add the rules so that the ping works in both directions.
AWS provides one more element to allow traffic control: Network Access Control Lists (often referred to as Network ACLs or NACLs). NACLs allow traffic control between different Subnets. Communication within a Subnet is always allowed, provided the Security Groups of the involved instances allow the traffic to pass through. They are configured much in the same way as Security Groups, having inbound and outbound rules. The major difference, however, is that NACLs are stateless: both directions of traffic flow must be configured explicitly. A NACL is created for a specific VPC and associated with Subnets. Every VPC has exactly one default NACL and can additional NACLs. Every Subnet has only one NACL associated. If a Subnet is created without explicitly associating an NACL with that Subnet, the Subnet is associated with the VPC’s default NACL.
By clicking on , typing VPC, hitting enter, then clicking on Network ACLs, we get a list of all NACLs. Ticking the checkbox next to the NACL associated with your VPC opens a detailed view at the bottom of the screen. Let us inspect the inbound rules first.
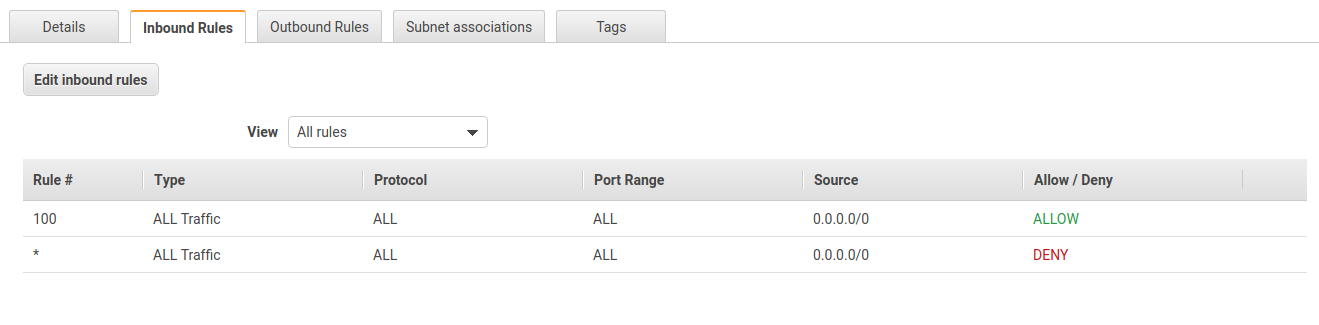
The rules look very much like the rules of Security Groups. One difference, however, is the priority associated with each rule. The NACL rules are executed in order of their priority. A smaller number indicates higher priority. Thus, a higher-priority rule always beats a lower-priority rule. A priority of * is the lowest priority, i.e. the associated rule is executed last. The incoming rules of this NACL allow all incoming traffic. The rules for outgoing traffic are identical.
Let us modify the NACL in various ways to see how it affects communication between the two EC2 instances. First, start pinging each instance from the other and let the ping run in the background. This way, you can observe the effect of the NACL modifications immediately.
the outbound rules and add the following rule:
* Rule#: 90
* Type: All ICMP - IPv4
* Destination: 192.168.1.0/24
* Allow/Deny: Deny
Before you save the rule take a moment and think about what reaction you expect from the system. Then hit and observe your terminals.
Why is it that both ping commands have stopped working? The rule denies all ICMP-packages that are targeted for the AZ 2 Subnet. This includes the echo request, as well as the echo reply. While the echo request from the AZ 2 Subnet is able to enter the AZ 1 Subnet, the echo reply from the AZ 1 Subnet back to the AZ 2 Subnet gets blocked by the NACL.
Let us this rule, choosing “Custom ICMP Rule” as Type and “Echo Reply” as Port Range. Upon clicking , the ping from the EC2 instance in AZ 1 to the EC2 instance in AZ 2 will start responding again, while the ping in the other direction still fails.
Try to find other rules so that pinging is only allowed from AZ 1 to AZ 2, but not the other way around. How many way can you find? I found three additional rules 😀
It is important that you terminate the EC2 instances before deleting the VPC. Otherwise, you cannot delete the Internet Gateway since public accessible IPs are mapped to it.
Start by closing your SSH-connections to both EC2 instances. Then, click , type EC2, hit enter and click on Instances. Tick the boxes next to both instances you created, then click ,  ,
, . Confirm termination of the instances by clicking
  . Wait until the instances are listed as “terminated” (this should take not longer than two minutes). After some time, the instances will disappear from this overview, but you do not have to wait for this to happen.
Next up, we delete the VPC. For this click on , type VPC and hit enter. On the next page, click on Your VPCs. Check the box next to your VPC, then click , . Confirm deletion by clicking
  . Through the deletion of the VPC, all associated resources (Subnets, Internet Gateways, NACLs,…) should be deleted as well.
Please check thoroughly whether all resources have been removed. Specifically check that the Internet Gateway, Subnets, NACLs and Security Groups are deleted.
In this article, we discussed the network infrastructure provided by AWS. To understand the concept of a VPC and Subnets, we looked at how Amazon distributes its data centers around the world, and how they are organized in regions and availability zones.
You created a small sample network, consisting of one VPC and two Subnets. The Subnets were in different availability zones. You deployed one EC2 instance for testing purpose, as well as an Internet Gateway with a corresponding route to allow access to the EC2 instances.
To allow a ping to succeed between the two instances, we discussed Security Group. Through modification, you modified the Security Groups of the EC2 instances to allow SSH connections. In this process, we learned that Security Groups are stateful. Each EC2 instance is guarded by one Security Groups, though one Security Group can be assigned to multiple EC2 instances.
Traffic between Subnets can be controlled through NACLs. In contrast to Security Groups, NACLs are stateless and bound to whole Subnets instead of EC2 instances. We shortly discussed that communication within a Subnet is always possible, save the Security Groups of the involved instances permit it. You modified the existing NACL of the VPC, so that pings were only successful from one subnet to the other, but not the other way around.
If you have any questions or remarks, feel free to contact me via marco(dot)bungart(at)consol(dot)de or Twitter.