


Today software often needs to be run in cloud environments. Newly developed software, especially microservices are developed with cloud readiness in mind.
But we not only have microservices in business environments, we also have integration software. This type of software is developed and designed to connect external services to internal ones.
To make this kind of software cloud ready and to make it an ease to deploy them in cloud environments Camel K came up. In this article we will have a look at how Camel K works and what are the concepts behind it.
As mentioned in the short introduction, one of the big goals in today’s software development is to have the software “cloud ready”.
This includes packaging and sizing, as startup time becomes important within the cloud, as well as making it run in a container environment such as docker.
For most modern architectures like microservices this is already the case.
A special kind of software indeed is the integration software. The goal of such a software system is to integrate or connect external services to local ones.
Therefore, often data conversions are needed.
Assuming the following situation: You have an external service sending its data to one of your own services. The incoming data is in XML format, but your systems all work with json as an exchange format.
So the incoming data has to be transformed in order to be useful for your own systems. What you can do is to set up a microservice as the entrypoint to your system which converts the incoming data to the needed json format.
Then call the next service and so on.
But with an integration software framework you can do better. Integration Software is tailored for converting and transforming data and to connect several systems with each other.
Two famous Integration Frameworks are Apache Camel and Spring Integration. Both of them can also be used with the famous Spring Boot Framework.
In this article we will have a brief look at Apache Camel, as this is the technology where Camel K is based on.
If you are already familiar with Camel you can skip the next paragraphs and start at Kamel K.
Apache Camel was initially released on June 27, 2007 and has come a long way since then. The idea behind it is to have a framework with a lot of components to make it easy to connect to standardized interfaces.
So for example there are components for HTTP (inbound and outbound), FTP, Mail and many more. For the complete list visit Camel Components Reference.
First I will start with a short overview of the basic Camel architecture and a short explanation of each single part.
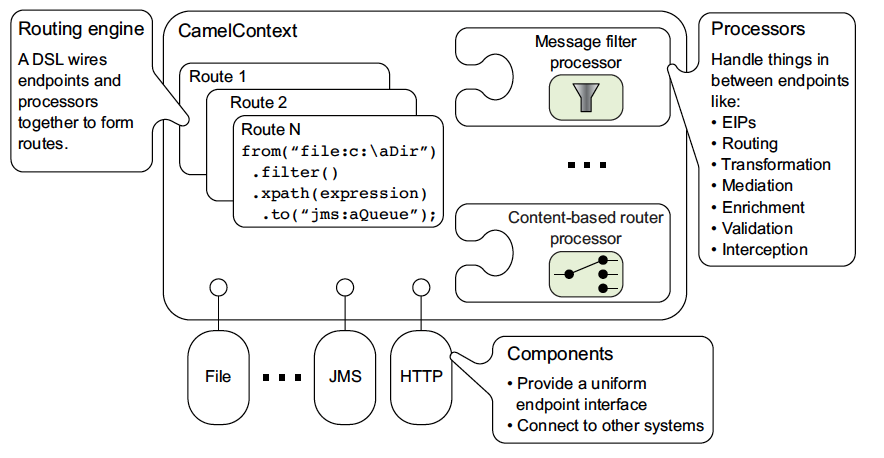
Camel Architectural Overview from https://camel.apache.org/manual/architecture.html
The main component of Camel is the Camel Context. It holds up all the features which Camel has to offer e.g.
So when you start a Camel application you have to initialize the context. If you run a standalone Camel application you have to initialize the context by your own.
If you use Spring Boot with the various Camel Starters the framework will do this for you.
Once the context is initialized the routes has to be added. In standalone mode this must be done by yourself or in SpringBoot this will happen automatically as long as you define your RouteBuilder in a Class which is annotated with @Configuration.
The Camel context also holds the routing engine which is responsible for running the routes.
The following graphic shows an example workflow for a Camel route.
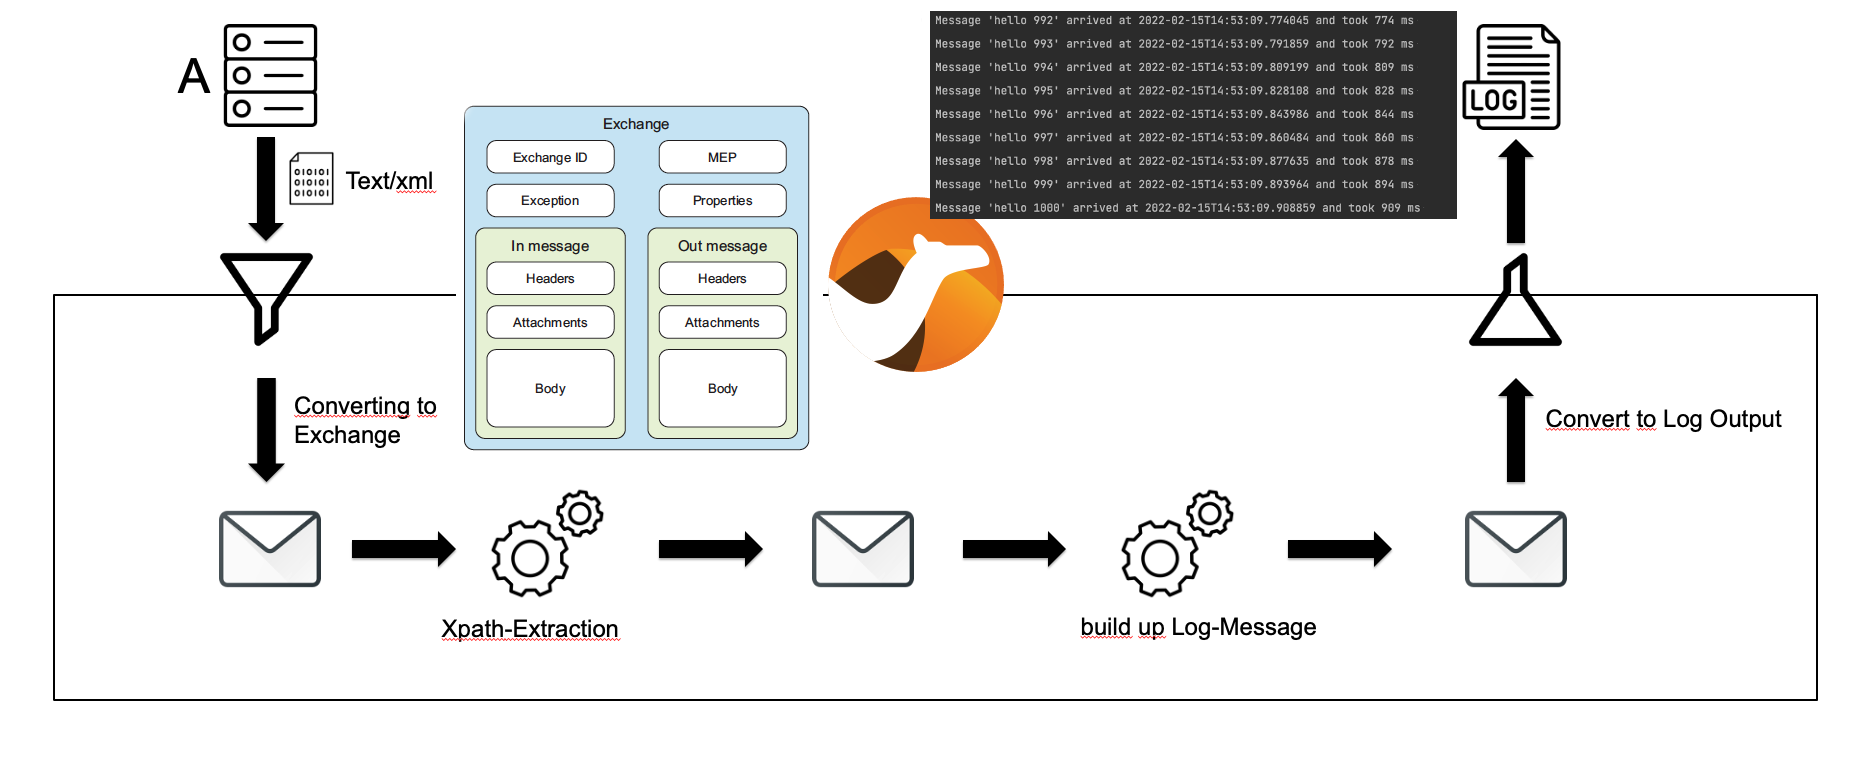
Schema of the example route
In the example we start with a http call from system A in the top left corner. The system sends a POST request with a xml body to an endpoint provided from the Camel example application.
The format of the body is the following:
<?xml version="1.0" encoding="UTF-8" ?>
<message>hello </message>
XML Body of the incoming message
The incoming request is transformed to an internal Camel object, called Exchange. An Exchange includes several fields and objects.
The main components are:
After the incoming data is transformed to an exchange, this exchange is routed to the next step in the process, in our example to the XPath extraction step. Within this an XPath Expression is evaluated against the incoming message body which is basically the payload from the incoming http request.
The result from the XPath evaluation is the message string sent from the client. This string is the new body from the out message of the exchange and will be the input for the next step.
The next step is the concatenation of the log output. This will then be the input parameter for the log component which is responsible for logging to the given logger.
Here you can see the source code for this process:
import org.apache.Camel.Header;
import org.apache.Camel.builder.RouteBuilder;

import java.time.Clock;
import java.time.LocalDateTime;
import java.time.ZoneOffset;

public class Example extends RouteBuilder {
    public void configure() throws Exception {
        from("netty-http:http://0.0.0.0:8080/myapp/myservice")
            .setHeader("incomingTimestamp", method(LocalDateTime.class, "now()"))
            .convertBodyTo(String.class)
            .setBody(xpath("/message", String.class))
            .to("seda:secondRoute");

        from("seda:secondRoute")
            .setHeader("duration", method(this, "calculateDuration"))
            .log("Message '${body}' arrived at ${headers.incomingTimestamp} and took ${headers.duration} ms ");
        }

    public long calculateDuration(@Header("incomingTimestamp") LocalDateTime incomingTimestamp) {
        final ZoneOffset offset = Clock.systemDefaultZone().getZone().getRules().getOffset(incomingTimestamp);
        return System.currentTimeMillis() - incomingTimestamp.toEpochSecond(offset) * 1000;
    }
}
Java Source Code of the example route(s)
You can see in the code that in Camel terms an integration process is called Route. This route is configured in a RouteBuilder.
Every route starts with an from clause. Within the from you specify the source of this integration. This is always a Camel component which acts as a so called Consumer as it consumes data and converts it to something meaningful for camel.
You can also see that the first route end with a to clause, which is most times the case. The to clause also specifies a camel component which than acts as a so called Producer as it produces objects from the internal Exchanges.
So you can see that we use the netty-http component which sets up an incoming HTTP Endpoint listening on localhost on port 8080 and the path /myapp/myservice.
In the second line of the route definition we are using the message headers, which already contain some HTTP Headers mapped from the incoming message to Camel headers, to store some other information.
In this case we use it for storing the receiving timestamp of the message in order to log the message processing duration at the end of the route.
Going on with the next line we convert the message body to a string because as of now the body was an input stream which could only be read once.
On this string we perform the XPath expression to extract the message string from the request and set it as the new body of our exchange.
After that we route to a second route which is also defined in this same RouteBuilder.
This second route starts with the seda Camel component which is an asynchronous way to transfer data within the same Camel context. You can imagine the seda component as a non-blocking method call on an arbitrary java object.
In this second route we also use a header to store a second information which we want to print out in the log - the calculated message processing duration.
This time we use the bean component to call an arbitrary java method. To make it easier, especially in Camel K, we define the method to be called in our RouteBuilder itself. This way no external dependency is needed.
The last step of the route is to concatenate the log message with the message body and the information stored in the message headers and use this as the input for the log component which logs the message simply to System.out.
Having looked at the very basics of Camel, we will come now to the main topic of this article - Camel K.
In the next subsection we will start with the installation of Camel K with the help of the kamel cli.
Afterwards we are going to deploy our Camel example route and have a look at what happened in the cluster.
If you want to follow the steps shown here, you will have to install Minikube.
All the commands will be sent by using kamel or kubectl. If you are using Red Hat CRC or something else, you have to look for the right command by your own.
Before you are going to install Camel K you first have to set up your kubctl environment. This can be done by using a development cluster like Minikube or you can set up your kubectl command to connect to an existing external cluster.
After that configuration installing Camel K is really straight forward and simple. All you have to do is to download the kamel cli, put it in a directory which is on your path and issue the following command:
kamel install
Info: The installation command will be run against the cluster you are currently connected to.
If you get errors check the Installation Instructions .
You might have to do some extra work beforehand, depending on the cluster type you are using.
When you issue kubectl get pods you should see that a new operator pod for Camel K was deployed and that this pod should be in running state.
If not, you should check the logs for error messages.
After the successful installation, we should run our Camel route within Camel K.
This is also as straightforward as the installation was.
Just create a Example.java file with the contents from above. Open a terminal in the same folder as the java file is located and run:
kamel run Example.java --dev
With the --dev your terminal get attached to the log output of the running integration. Furthermore, all changes that you make to the source code will reflect to a change in the running pod.
Info: With the cli you can also add Traits or dependencies to your Integration (if necessary).
You should see the log output of the pod which is spinning up. Depending on the speed of your cluster this might take a moment to finish.
After the pod is started you should see something like this:
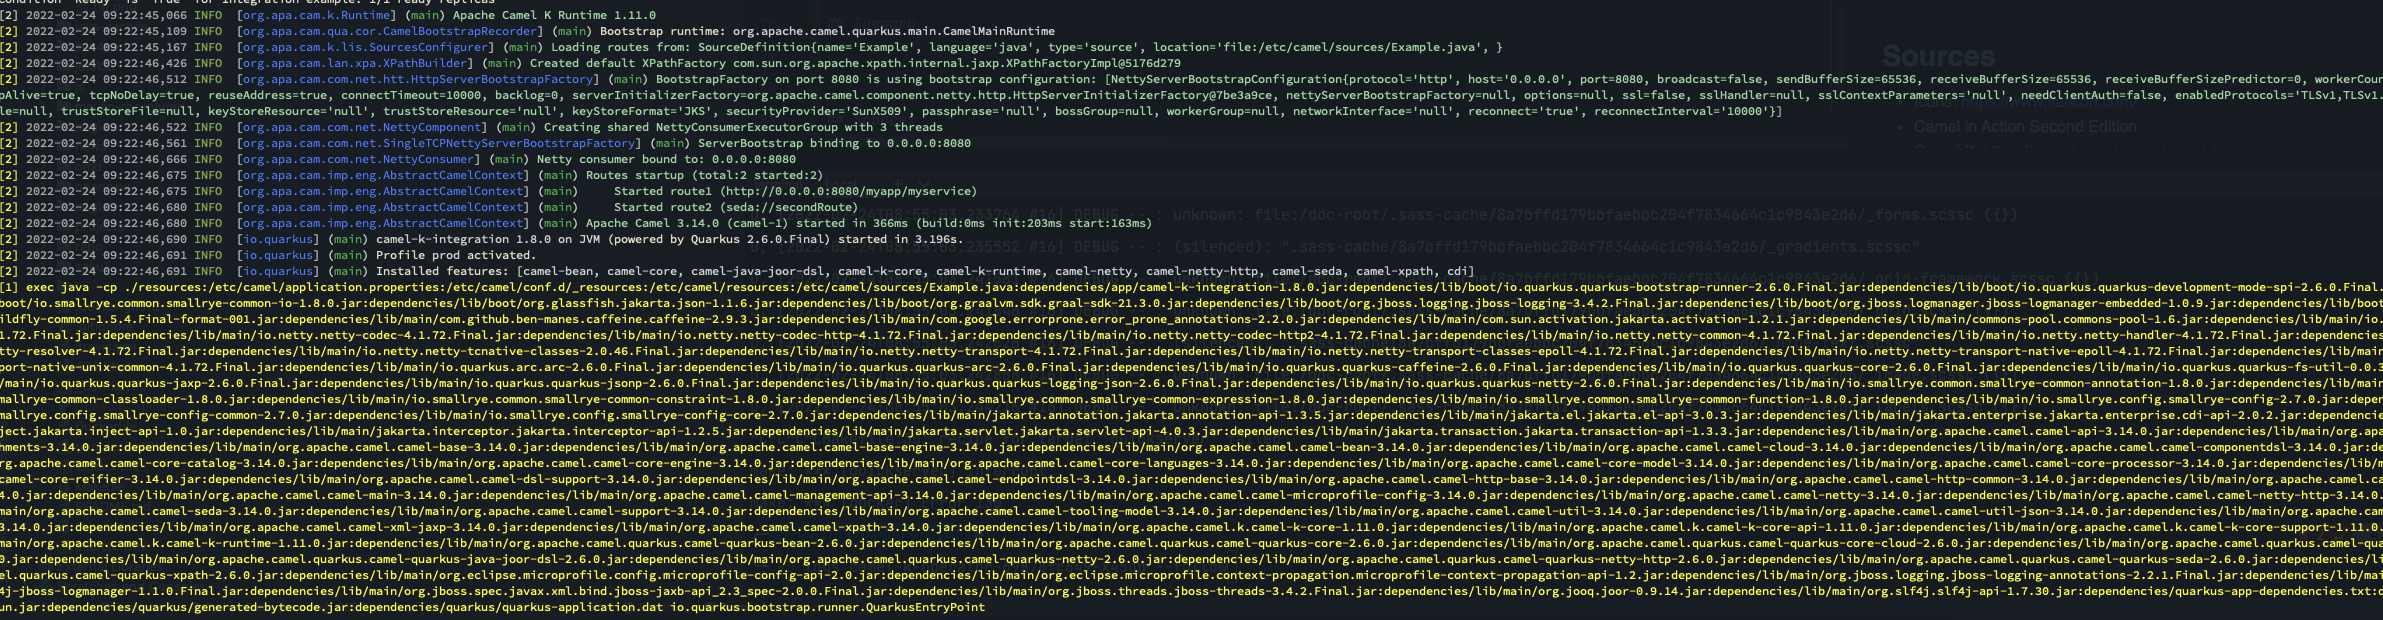
Example Route startup log
As the integration is now successfully deployed, we are able to issue the first request.
Therefore, we have to get the port on which our application is listening for incoming requests.
This can be done with the following command:
kubectl get service
The output should look like something like this:

The port our Integration is listening at
In the above picture you can see that the port for this application is 32522 and that the type is a container port. This means by sending request to this port, the request will be handled by this particular container.
So we have to send our request to
http://CLUSTER_IP:32522/myapp/myservice
Here is the curl command you can send to the server to see if the integration is running as expected:
curl --location --request POST 'http://CLUSTER_IP:32522/myapp/myservice' \
--header 'Content-Type: text/plain' \
--data-raw '<?xml version="1.0" encoding="UTF-8" ?>
<message>hello 1</message>'
Don’t forget to replace CLUSTER_IP with the actual IP address or name of your cluster.
And that’s how the output in the log should look like:

After we have the integration running we should have a look under the hood to see how things work together.
To get a good impression about how many components are building up Camel K, we should take look at the
following architectural overview from the Camel K website:

Architectural overview from https://camel.apache.org/Camel-k/1.8.x/architecture/architecture.html
We will focus on the following components, as they are the most important ones:
The Camel K Operator is implemented as a kubernetes operator and therefore it follows the controller pattern.
This pattern is based on the idea that the operator will try to get the resources, for which it is responsible for, in a desired state.
Therefore, it will apply changes, monitor and reconcile the resource until this state is reached.
When the state is reached it will go along monitoring the resources and check if there are any changes need to be applied.
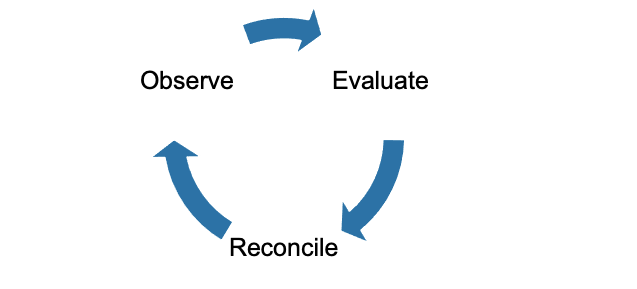
Operator Pattern
The operator is responsible for creating and gathering all the resources needed for the Camel K Runtime to do their work.
After the Camel K Runtime has build the container, the operator will create all the necessary kubernetes resources and will observe their state.
Traits are build-in Camel K Features which will be applied to the Camel route.
You can define the traits you want to apply to your route by setting them as an argument to the kamel run call.
For example if you want to apply the jolokia trait to use a jolokia client within your route you can do so with the following command:
kamel run --trait jolokia.[key]=[value] --trait jolokia.[key2]=[value2] integration.groovy
You can also add this to your java file, as a so called modeline.
// Camel-k: jolokia.[key2]=[value2]

import org.apache.Camel.Header;
import org.apache.Camel.builder.RouteBuilder;

import java.time.Clock;
import java.time.LocalDateTime;
import java.time.ZoneOffset;

public class Example extends RouteBuilder {
public void configure() throws Exception {
from("netty-http:http://0.0.0.0:8080/myapp/myservice")
...
There are several traits which will automatically be applied to your route.
These are traits which are essential to run your route on the cluster type you are on.
These so called standard traits exist for every supported cluster type e.g. kubernetes, knative and Openshift.
The information which is needed to decide which trait has to be applied is served by the IntegrationPlatform.
A full list of the available traits can be found under https://camel.apache.org/Camel-k/1.8.x/traits/traits.html.
The IntegrationPlatform is a so called CR (Custom Resource). Custom Resources are a mechanism to extend kubernetes.
You can find more information on https://kubernetes.io/docs/concepts/extend-kubernetes/api-extension/custom-resources/.
The IntegrationPlatform resource is responsible for storing common configuration values which the operator needs to work and which is applied to every route.
The following values are stored:
The Integration is the resource which represents the actual Camel application.
It holds the following values:
The Integration Kit is a side resource which is used in combination with the container image which is the output of the operator run.
It is needed to run the container image as it holds the run configuration for this particular image which means:
The Build resource describes the process of combining the Image, Integration Kit and the Integration to get a running container.

The build process
The Camel Catalog holds the necessary information for the Camel K Runtime.
It stores the following:
These are some information which in a regular Camel application is stored in the Camel Context.
The Camel K Runtime is a java based application which gets called from the Operator.
It is responsible for converting all the resources supplied by the operator (Traits, ConfigMaps, Properties, Secrets etc.) to something which can be understood by the regular Camel runtime which will execute the code within the container.
After the conversion is done, it will build the image in which the Camel code runs. This is done with the help of Camel Quarkus.
After the image is build it is pushed to the Container Registry of the cluster to be available for the regular kubernetes build.
After we looked at all the resources involved to get an integration running in Camel K we will finally take a look at the process of running an integration.
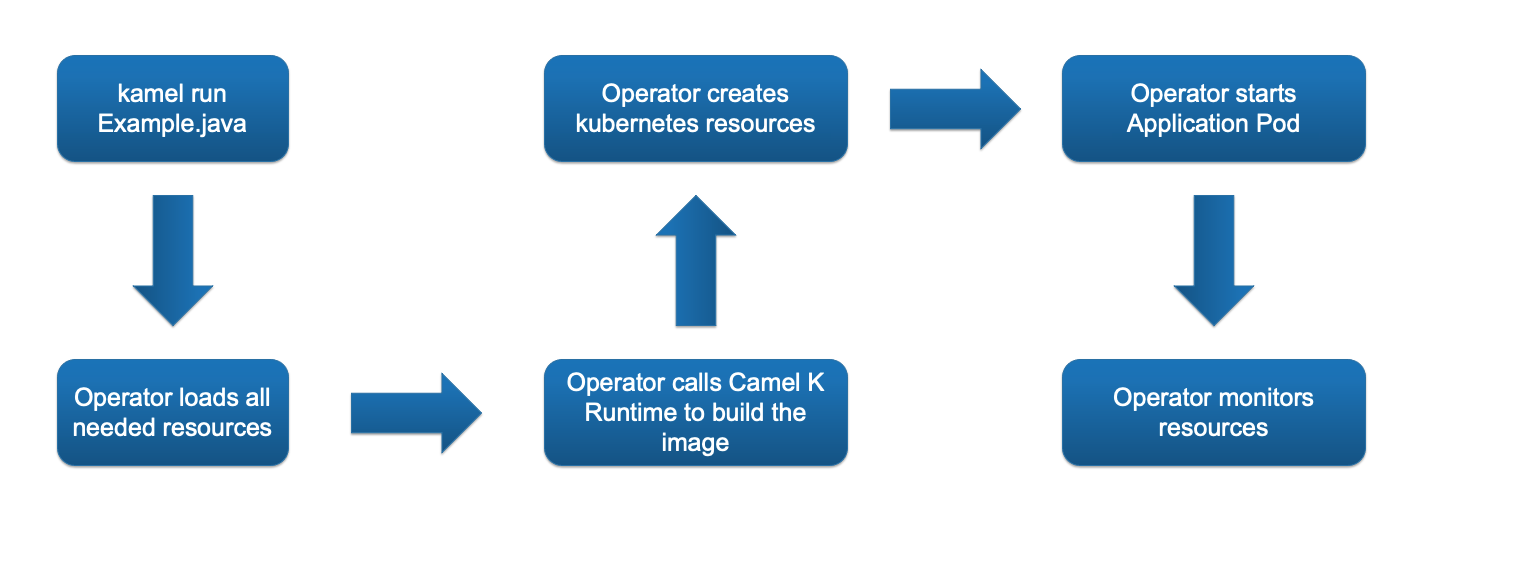
Startup Process of an Integration in Camel K
kamel run Example.java command, the source code and optional parameters like dependencies (only if your route needs dependencies which are not part of Camel or in particular camel-quarkus)pom.xml defining our dependencies and as we - at least for most cases - don’t specify dependencies with Traits or arguments,In this article we took a look under the hood of Camel K.
We first talked about Camel in general and the idea of integration software.
We then went to Camel K and took a tour starting with the installation, to running an example integration ending in the chapters to see how all the magic is done.
So, is Camel K the best way to run Camel integrations in a cloud environment ?
It depends.
If you can start from scratch and have only simple routes with basic Camel logic and with none or only a few external dependencies, Camel K might be a good solution for you.
If you have to migrate an existing Camel based software and/or if you have more complex requirements the following limitations might stop you from using Camel K:
So for more complex integration needs it might be better do develop a classical camel application, maybe supported by Spring or other frameworks, and deploy them as every other javan application too.