


GraphQL is a nice way to publish a highly customizable API. In combination with Spring Boot, which makes development really easy and offers features like database integration and security, you can quickly build your API service from scratch.
This is the second part of the series in which we will create a REST-Service based on Spring Boot which will be translated in a GraphQL Service in the 3rd part of this little series.
In the first part of this series we already learned about REST and GraphQL. I explained what each of them is good for and in which case you should use REST and when you should use GraphQL instead.
In this part we will create a REST WebService based on Spring Boot which will be transformed to GraphQL in the third part of this series.
The service which we will build is a simple backend for a guestbook. To keep it very simple we will build only the backend, which will give us the opportunity to get a list of guestbook entries via a REST interface which then can be consumed by every client like a website or a mobile app.
Furthermore it will allow us to add a new entry, as well as delete an existing one. The delete operation will be secured by basic auth, as we don’t want any user to delete entries from our guestbook.
Each guestbook entry consists of a title, a message and the name of the author.
To keep it simple we will not use any database. The first message is hardcoded and stored in a simple list, only kept in memory. All new entries added via the REST interface will be added to this list. Also the credentials to log in are stored within the code. For authentication we will use the features provided by the Spring Framework.
Furthermore we don’t use specific Service and Repository layers. You should do so if you are going to write a real application intended for productive use, but we, in this little demo, will not.
In order to follow the setup, you will need a Java8 Runtime and a working installation of maven. If you want to download the source from the github repository you will need a git client.
Furthermore you need a Java IDE of your choice. I will use IntelliJ, so things might look a little different on your machine, at least if your setup differs from mine.
The source code we develop here can also be downloaded from https://github.com/ConSol/graphqlguestbook.
So buckle up and let’s start.
To setup the project from scratch we start at https://start.spring.io/ to select our needed components.
On the time writing this article the following settings should be the most actual ones
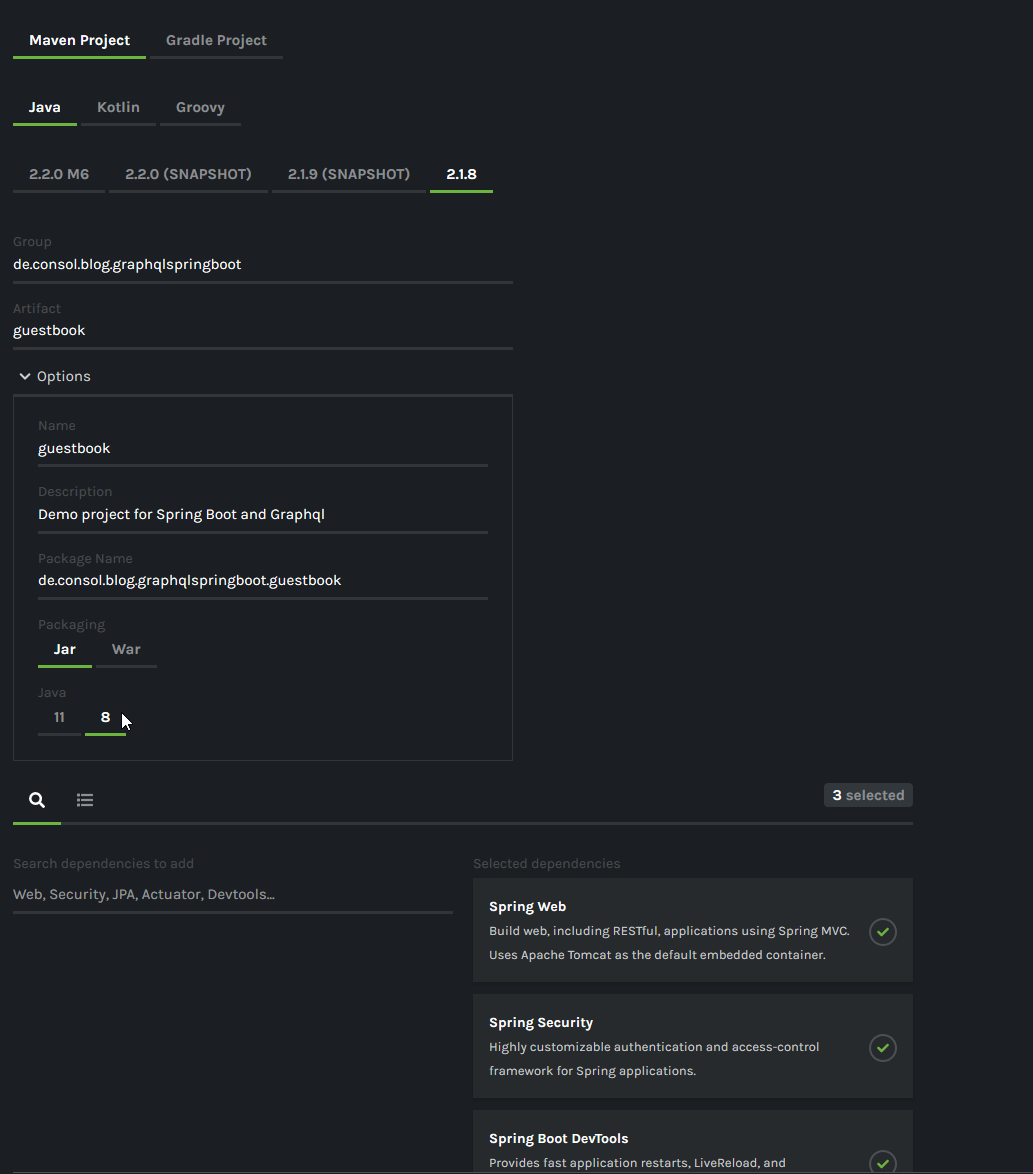
After you initialized the application with the above mentioned settings, download and extract the zip-File to a destination of your choice and open it in your preferred IDE.
You should see something like this:
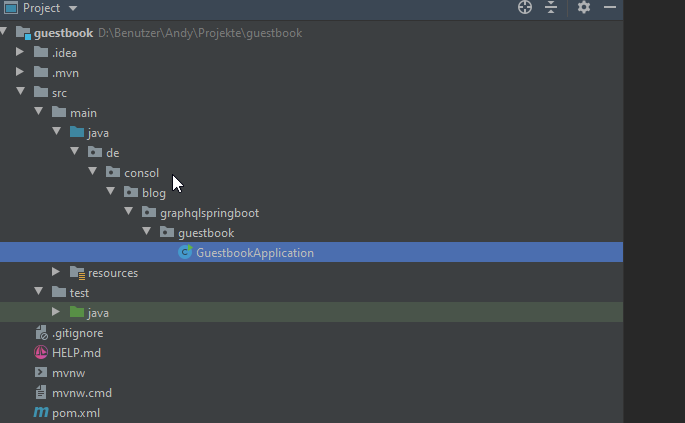
As you can see, the initializer has created an empty project with all the necessary code to run an simple SpringBoot application. We have an GuestbookApplication class which is responsible for startup and configuration,
as well as an simple test for even this application class.
Let’s begin by implementing our guestbook REST-endpoint.
Therefore we create an new class under the de.consol.blog.graphqlspringboot.guestbook.rest package and call it GuestbookController.
The class should be annotated with @RestController in order to show Spring that this is an endpoint class.
For our first step we also need a method which has no parameters and returns a list of strings. Let’s call this method getEntries. In the end this method will return a list of Entry object, but for now strings will be sufficient enough.
This method will also be called when you open the endpoint in the browser as an index page.
The complete listing of the class should look like this:
package de.consol.blog.graphqlspringboot.guestbook.rest;

import java.util.ArrayList;
import java.util.List;

import org.springframework.web.bind.annotation.GetMapping;
import org.springframework.web.bind.annotation.RestController;

@RestController
public class GuestbookEndpoint {

    @GetMapping()
    public List<String> getEntries(){
        List<String> result = new ArrayList<>();
        result.add("Hello World");
        return result;
    }
}
If you start the application by running the main method in the GuestbookApplication class and try to access localhost:8080 on your browser, you will be prompted with an login dialog.
>
Note: This is only the case if you follow this article along and code step by step. When you got the files from the github repository this is already fixed.
>
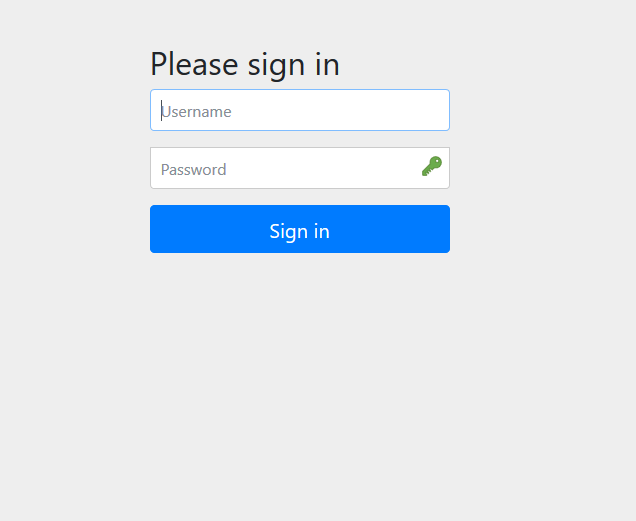
This is because we are using SpringSecurity. So by default all endpoints will be secured by username and password.
For now we will leave it as it is. Later on we will disable security for all endpoints except some selected ones such as the endpoint for delete.
If you want to access the endpoint and see the hello world message in your browser you can login with username user and the password which is prompted in the startup log of the application.
Search for a line like this (your password will be different):

In order to get rid of the hardcoded hello world return value with the Hello World message we are going on by implementing the Entry model of our guestbook. It consists of some basic string attributes:
Let’s implement the Entry class in a separate model package under de.consol.blog.graphqlspringboot.guestbook.model and give it the following content:
package de.consol.blog.graphqlspringboot.guestbook.model;

import java.util.Objects;

public class Entry {
    private String title, message,author;

    /**
     * Gets message
     *
     * @return value of message
     */
    public String getMessage() {
        return message;
    }

    /**
     * Sets message
     */
    public void setMessage(final String message) {
        this.message = message;
    }

    /**
     * Gets author
     *
     * @return value of author
     */
    public String getAuthor() {
        return author;
    }

    /**
     * Sets author
     */
    public void setAuthor(final String author) {
        this.author = author;
    }

    /**
     * Gets title
     *
     * @return value of title
     */
    public String getTitle() {
        return title;
    }

    /**
     * Sets title
     */
    public void setTitle(final String title) {
        this.title = title;
    }

    @Override
    public String toString() {
        return "Entry{" + "title='" + title + '\'' + ", message='" + message + '\'' + ", author='" + author + '\''
                + '}';
    }

    @Override
    public boolean equals(final Object o) {
        if (this == o) {
            return true;
        }
        if (o == null || getClass() != o.getClass()) {
            return false;
        }
        final Entry entry = (Entry) o;
        return Objects.equals(title, entry.title) && Objects.equals(message, entry.message) && Objects
                .equals(author, entry.author);
    }

    @Override
    public int hashCode() {
        return Objects.hash(title, message, author);
    }
}
After adding the class, instead of returning a simple string, we can return a list of Entry instances in our controller.
So we change the getEntries method in the controller to something like this:
public List<Entry> getEntries(){
        final Entry firstEntry = new Entry();
        firstEntry.setAuthor("Me");
        firstEntry.setMessage("Hello World");
        firstEntry.setTitle("The first message here");
        List<Entry> result = new ArrayList<>();
        result.add(firstEntry);
        return result;
    }
If you restart the application and have a look at your browser again you will see, that now a list of JSON objects is returned instead of simple strings.
That is because SpringBoot transforms java objects to their json representation out of the box.
Before we implement the missing endpoint methods for adding new entries and delete existing ones, we first have to deal with the security settings of our application.
By now, every time we start the application a new password is generated for the user user. We will change this to have a static password for the user and permit all users, even anonymous ones, to see the entries and add new entries as well.
For the security configuration we will have a SecurityConfiguration class under de.consol.blog.graphqlspringboot.guestbook.configuration where we will add our user and password to an InMemory authentication scheme.
This should only be used in demo or test cases, because it is of course not secure at all
See the following listing:
package de.consol.blog.graphqlspringboot.guestbook.configuration;

import org.springframework.context.annotation.Configuration;
import org.springframework.security.config.annotation.authentication.builders.AuthenticationManagerBuilder;
import org.springframework.security.config.annotation.web.builders.HttpSecurity;
import org.springframework.security.config.annotation.web.configuration.EnableWebSecurity;
import org.springframework.security.config.annotation.web.configuration.WebSecurityConfigurerAdapter;

@Configuration
@EnableWebSecurity
public class SecurityConfiguration extends WebSecurityConfigurerAdapter {

    @Override
    protected void configure(AuthenticationManagerBuilder auth) throws Exception {
        auth.inMemoryAuthentication().withUser("user").password("secret").roles("OWNER");
    }

    @Override
    public void configure(final HttpSecurity http) throws Exception {
        http.csrf().disable();
        http.authorizeRequests().antMatchers("/", "/entry").permitAll();
        super.configure(http);
    }
}
As you can see, we will ignore our root endpoint, which is for listing the entries, as well as the (not yet existing) entry endpoint which is for adding new entries.
When you restart the application and give it a try, you will see that there is no login form anymore and you can see all the existing entries without giving a username or password.
Adding the possibility to add new entries is very simple and straight forward. All we have to do is to add a new method in our controller, add the annotation that this will be a PostMapping and implement the logic.
To do so, we will refactor the code written above to have a managed list to share between the getEntries-Method and the addEntry-Method.
To make the life easier on creating Entry-Instances, will add a few new methods in the Entry class as well:
...
 /**
     * Sets message
     */
    public Entry message(final String message) {
        this.message = message;
        return this;
    }
...
 /**
     * Sets author
     */
    public Entry author(final String author) {
        this.author = author;
        return this;
    }
...
    /**
     * Sets title
     */
    public Entry title(final String title) {
        this.title = title;
        return this;
    }
Now with the above shown changes we are able to build our entry instances as shown in the following listing of the GuestbookController class:
package de.consol.blog.graphqlspringboot.guestbook.rest;

import java.util.ArrayList;
import java.util.List;

import javax.servlet.http.HttpServletResponse;

import org.springframework.http.HttpStatus;
import org.springframework.web.bind.annotation.GetMapping;
import org.springframework.web.bind.annotation.PostMapping;
import org.springframework.web.bind.annotation.RequestBody;
import org.springframework.web.bind.annotation.RestController;

import de.consol.blog.graphqlspringboot.guestbook.model.Entry;

@RestController
public class GuestbookController {

    private static List<Entry> result = new ArrayList<>();

    static {
        final Entry firstEntry =
                new Entry().author("Me").title("Hello World").message("This is the first message here");
        result.add(firstEntry);
    }

    @GetMapping()
    public List<Entry> getEntries() {

        return result;
    }

    @PostMapping(path = "/entry")
    public void addEntry(@RequestBody final Entry newEntry, HttpServletResponse response) {
        if (result != null && doesNotContainEntry(newEntry)) {
            result.add(newEntry);
        } else{
            response.setStatus(HttpStatus.NOT_ACCEPTABLE.value());
        }

    }

    private boolean doesNotContainEntry(final Entry newEntry) {
        return result.stream().filter(entry -> entry.getTitle().equals(newEntry.getTitle())).count() == 0;
    }
}
You can see that we share the result list globally in the controller. Furthermore you see the implementation of the addEntry method. Other than the getEntries method, this one is annotated with @PostMapping because this will be a post request sending us the data for a new entry.
The method checks if the given entry is null or if an entry with the same title already exists.
If one of this is true, the client will get an 406 error response which says that the given entity is not applicable. Otherwise the entry will be added to the list and the client will get 200 indicating that the operation was successful.
Last but not least we will implement the missing method to delete an entry by its title. If we would use a database to store our guestbook entries we would of course use the primary key of the entry to find the right one.
But as we only have an in memory list, the title is sufficient enough for our demo purpose.
So all we have to do is to create a new method in our controller, which gets the title of the entry to be deleted. Then lookup the entry in the list and delete if it exists, otherwise return a http 404 to the client.
Let’s have a look in the code:
@DeleteMapping(path = "/deleteMessage/{title}")
    public void deleteEntry(@PathVariable("title")final String title, HttpServletResponse response){
        Entry found = findEntryByTitle(title);
        if(found != null){
            result.remove(found);
        }else{
            response.setStatus(HttpStatus.NOT_FOUND.value());
        }
    }

    private boolean doesNotContainEntry(final Entry newEntry) {
        return result.stream().filter(entry -> entry.getTitle().equals(newEntry.getTitle())).count() == 0;
    }
As you can see, we use another mapping method, the @DeleteMapping. This is because we want to get a request with the HTTP Delete method. Furthermore we use a PathVariable for giving us the title of the entry to be deleted.
Give it a try in your REST tool of choice and use DELETE as your request method. You will notice when you try to call the deleteMessage endpoint, that you have to pass the user and password which we set up in the security configuration above. Otherwise the application will return a 401 indicating that you are not authorized to call this endpoint.
## Summary
In this post we have created a REST WebService on SpringBoot which can list and add guestbook entries, as well as delete a single one by giving the title. To secure the service we used SpringSecurity, one of the many components available for SpringBoot.
In the next episode we will convert this service to use GraphQL.